
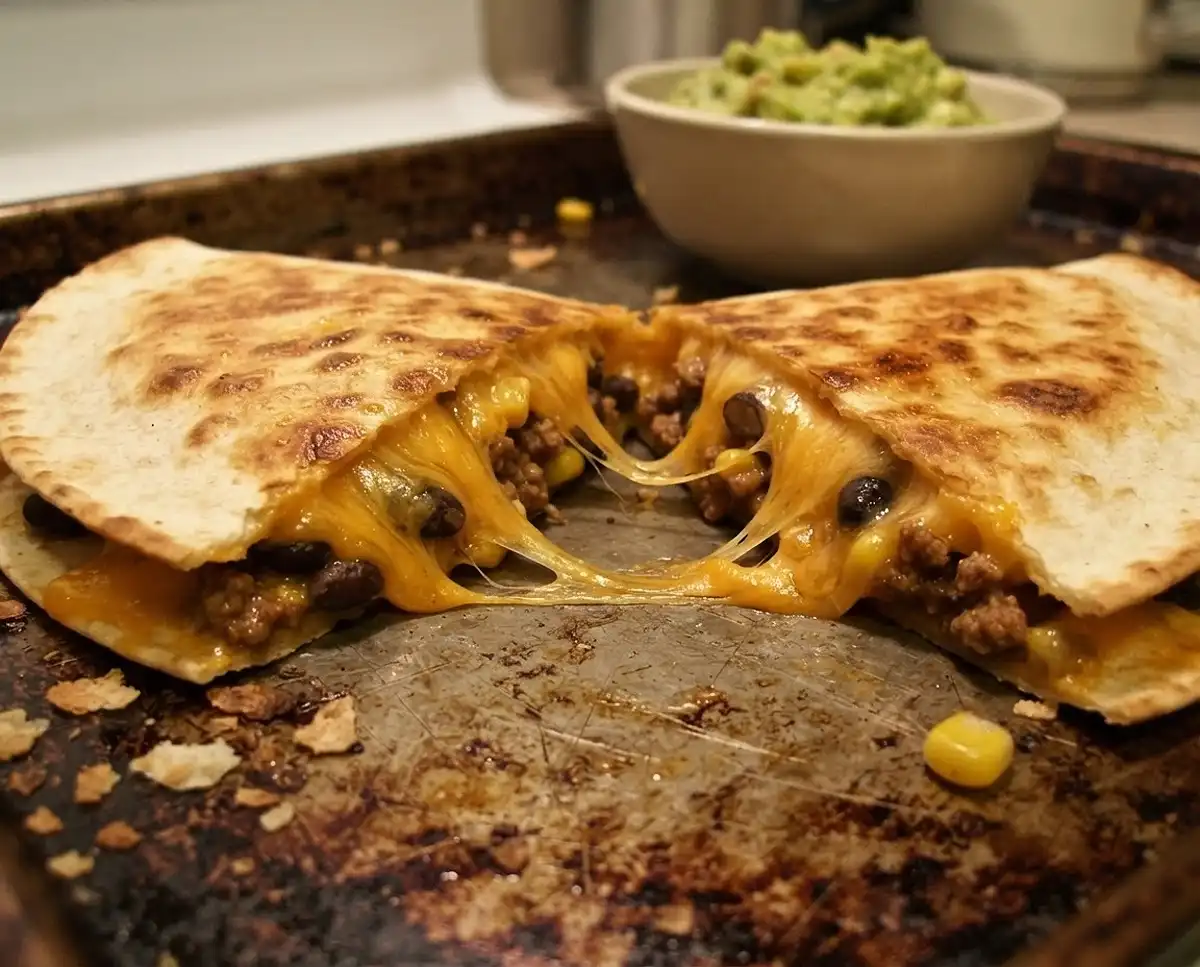
Crispy sheet-pan oven quesadillas feed everyone at once, no skillet babysitting. Juicy beef filling, golden edges, zero fuss. Come get the recipe.
I’ll be honest: I used to think quesadillas were a one-at-a-time, stand-over-the-stove kind of deal. Then I tried these crispy sheet-pan oven quesadillas and my skillet has basically been on vacation ever since. Golden, crunchy, cheese-stuffed, and shockingly hands-off. Fair warning: you’ll want to make them again by Thursday.
Table of Contents
Here’s the Deal With These Crispy Sheet-Pan Oven Quesadillas
This quesadillas recipe is built around one genius move: let the oven do the work. No flipping them one at a time, no cheese lava on your stovetop, no hovering. You load a tray, slide it in, and go pour yourself something.
The filling is a savory beef mince with homemade taco seasoning, tomato paste, black beans, and sweet corn. It’s juicy but never soggy, which matters more than you’d think. Soggy filling is the arch-nemesis of crunch.
The tortillas get a little olive oil rubbed over the top, then a blast of high heat. The edges turn shatteringly crisp while the middle stays gooey and melty. Honestly, the sound of that first cut is half the reason I make these.
What Makes Them So Crunchy
Three things: a hot oven, a rubbed-on layer of oil, and a filling that’s cooled before it ever touches the tortilla. Skip any of those and you’ll end up with something closer to a warm, sad wrap.
A great beef quesadilla is also about balance. Too much filling and everything steams. Too little and you’re basically eating cheese bread, which, to be fair, isn’t the worst fate.
Why a Sheet Pan Beats the Skillet
Pan chicken quesadillas are lovely, but a skillet only fits one or two at a time. A sheet pan holds a crowd. Everybody eats at the same moment, and nobody gets stuck with the cold one at the end.
Crispy Sheet-Pan Oven Quesadillas for Easy Weeknights
Equipment
- Non-stick pan
- Mixing bowl
- Metal baking tray
- spatula
- Food thermometer
- Knife
- Measuring cups and spoons
Ingredients
Filling
- 2 tsp olive oil
- 250 g beef mince (ground beef) 8 oz; or chicken, turkey, pork, or lamb
- 1 tbsp tomato paste
- ⅓ cup corn kernels canned (drained) or frozen
- ⅓ cup black beans canned, drained
- 2 tbsp water
Homemade Taco Seasoning
- ½ tsp ground garlic
- ½ tsp ground onion
- ½ tsp dried oregano
- 1 tsp ground cumin
- 1 tsp paprika powder
- ⅛ tsp cayenne pepper optional
- ¼ tsp cooking salt or kosher salt
Quesadillas
- 4 flour tortillas 20 cm / 8 in; Mission crisps best
- 3 tsp olive oil 1 tsp for the tray, ½ tsp for the top of each quesadilla
- 1¼ cups shredded cheese tightly packed; cheddar, colby, tasty cheese, or Monterey jack (not mozzarella)
Serving
- avocado sauce or guacamole optional
- pico de gallo optional
- sour cream optional
Instructions
Make the Filling
- Heat the olive oil in a non-stick pan over high heat. Add the beef and cook, breaking it up as you go, until most of the red color is gone. Ground beef should reach 160°F.
- Add the taco seasoning and cook for 1 minute. Add the tomato paste and cook for 30 seconds, stirring so it doesn’t catch.
- Stir in the black beans and corn, then add the water and stir. You want the filling juicy but not watery.
- Spoon the filling into a bowl and let it cool for at least 15 minutes.
Assemble and Bake
- Preheat the oven to 220°C / 425°F (200°C fan-forced). Grease a metal tray with 1 teaspoon of olive oil.
- Spread a thin, even layer of filling over one half of a tortilla, top with cheese, and fold it over. Place it on the tray and repeat with the remaining tortillas.
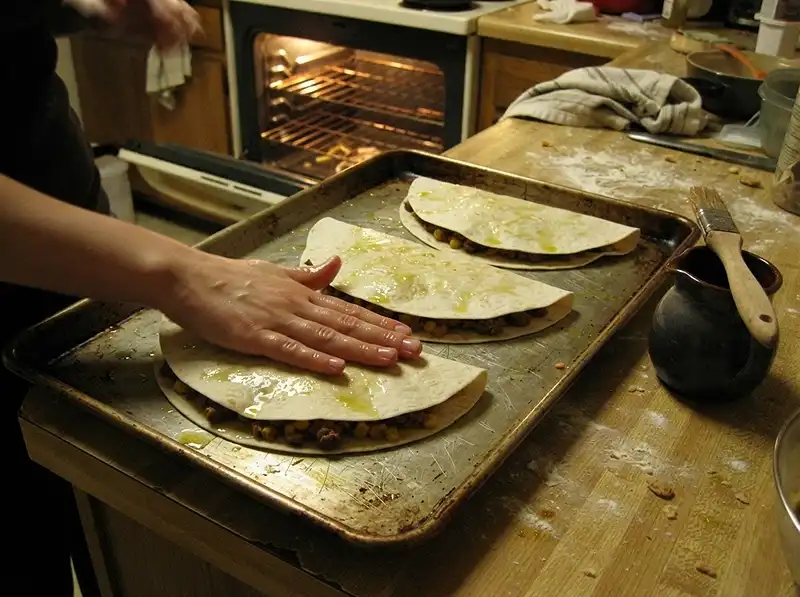
- Drizzle ½ teaspoon of olive oil over each quesadilla and spread it by hand over the top and sides, but not the underside. Press each one down to flatten it.
- Bake for 8 minutes, then flip and bake for 5 minutes. Flip again and bake for 2 more minutes, or until crispy. Spritz any pale ones with a little oil.
- Cut each quesadilla in half and serve right away with your choice of dips or toppings.
Notes
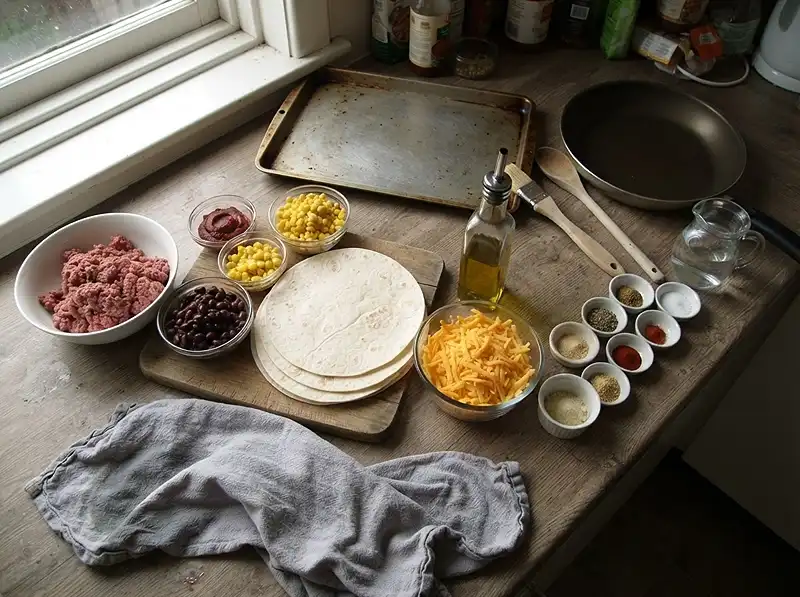
Ingredients for Crispy Sheet-Pan Oven Quesadillas
Nothing fancy here. Most of this is probably in your pantry already, and the taco seasoning is a quick DIY blend you’ll end up sprinkling on everything.
| Group | Ingredient | Notes |
|---|---|---|
| Filling | 2 tsp olive oil | For browning the beef |
| Filling | 250 g (8 oz) beef mince (ground beef) | Or use chicken, turkey, pork, or lamb |
| Filling | 1 tbsp tomato paste | Adds depth and a little sweetness |
| Filling | ⅓ cup corn kernels | Canned (drained) or frozen |
| Filling | ⅓ cup black beans | Canned and drained |
| Filling | 2 tbsp water | Keeps the filling juicy |
| Quesadillas | 4 flour tortillas (20 cm / 8 in) | Mission crisps best, Old El Paso the least |
| Quesadillas | 3 tsp olive oil | 1 tsp for the tray, ½ tsp for the top of each quesadilla |
| Quesadillas | 1¼ cups shredded cheese, tightly packed | Cheddar, colby, tasty cheese, or Monterey jack (not mozzarella) |
| Homemade taco seasoning | ½ tsp ground garlic | Pantry staple |
| Homemade taco seasoning | ½ tsp ground onion | Pantry staple |
| Homemade taco seasoning | ½ tsp dried oregano | Earthy backbone |
| Homemade taco seasoning | 1 tsp ground cumin | The taco flavor |
| Homemade taco seasoning | 1 tsp paprika powder | Color and warmth |
| Homemade taco seasoning | ⅛ tsp cayenne pepper | Optional, for a little kick |
| Homemade taco seasoning | ¼ tsp cooking salt / kosher salt | Season to taste |
| Serving | Avocado sauce or guacamole | Cool and creamy |
| Serving | Pico de gallo | Fresh and bright |
| Serving | Sour cream | Classic dipper |
| Serving | Nothing at all | I happily eat them plain |
A Few Notes on the Key Players
Tortillas: They matter more than you’d expect. Mission crisps best, and Old El Paso crisps the least. Go for the thinner, sturdier kind rather than anything doughy and pillowy.
Cheese: Skip the mozzarella. It’s wonderful on pizza, but cheddar, colby, tasty cheese, or Monterey jack melt into the golden, flavorful layer a proper cheese quesadilla needs. Pack it tightly into the measuring cup. Yes, really.
Beef: Beef mince is the star, but this one’s flexible. Chicken, turkey, pork, or lamb all slide right in. Go with chicken and you’ve basically made pan chicken quesadillas, just baked instead of fried.
Seasoning: The homemade taco blend takes about two minutes and skips the mystery fillers you find in packets. The cayenne is optional, so add it if your crowd likes a little heat.
How to Make Crispy Sheet-Pan Oven Quesadillas
Step 1: Brown the Beef
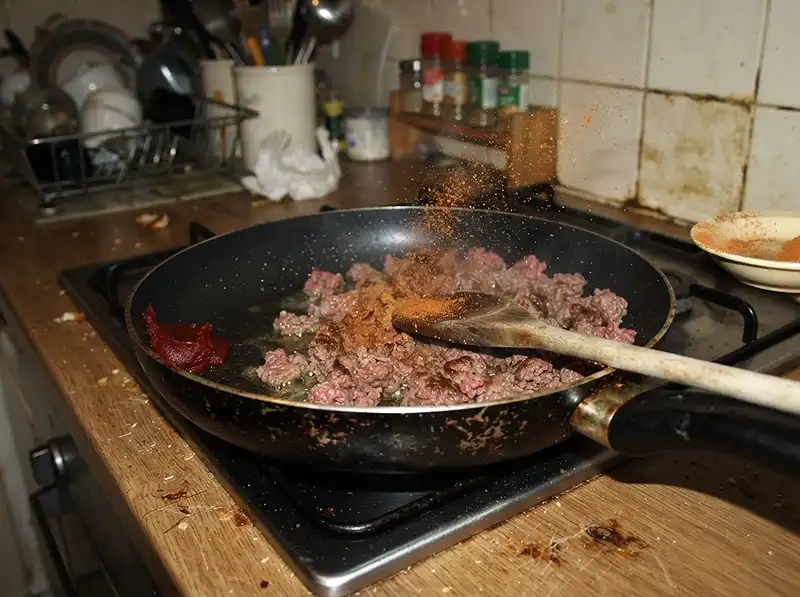
Heat the olive oil in a non-stick pan over high heat. Add the beef and cook, breaking it up as you go, until the red color is mostly gone. You’ll hear a loud, happy sizzle. That’s the sound of dinner getting its act together.
Want to be sure it’s cooked? Use a thermometer. The USDA’s food safety guidance puts ground beef at 160°F. Small crumbles also mean easier folding later.
Step 2: Season and Build the Filling
Add the taco seasoning and cook for 1 minute. Your kitchen will smell so good the neighbors might start wandering over. Then add the tomato paste and cook for 30 seconds, stirring so it doesn’t catch.
Stir in the black beans and corn, then add the water and stir again. You want the filling juicy but not watery. Too much liquid compromises crispiness, and crispiness is the whole point here.
Step 3: Cool It Down (Don’t Skip This)
Spoon the filling into a bowl and let it cool for at least 15 minutes. Trust me, don’t skip this part. Hot filling steams the tortilla from the inside out, and then you’re back to floppy.
Step 4: Assemble the Quesadillas
Preheat the oven to 220°C / 425°F (200°C fan-forced). Grease a metal tray with 1 teaspoon of olive oil. I use my hand, because it’s faster and, frankly, I enjoy the mess.
Spread the filling on one half of a tortilla, top with cheese, and fold to cover. Place it on the tray and repeat with the remaining tortillas. Go easy on the filling. A thin, even layer folds better and bakes crisper.
Step 5: Oil, Press, and Bake
Drizzle the top of each quesadilla with ½ teaspoon of olive oil, then spread it over the top and sides with your hands. Skip the underside, since the tray already took care of it. Press each one down to flatten the surface.
Bake for 8 minutes. Flip the quesadillas, bake for 5 minutes, then flip again and bake for a further 2 minutes, or until crispy. If any look a little pale, spritz them with oil. Sometimes they need a helping hand.
Step 6: Cut and Serve
Cut each quesadilla in half and serve immediately with a dipping sauce or toppings of your choice. Hot is non-negotiable. This is when the crunch peaks, so don’t let them sit around gossiping.
Pro Tips for Crispy Sheet-Pan Oven Quesadillas
Use a metal tray. Metal heats fast and browns the underside nicely, so you get crunch on both sides instead of just the top.
Watch the liquid. Your filling should look juicy in the pan, but it shouldn’t pool. If it’s soupy, give it another minute over the heat before you cool it.
Oil the top and sides only. Spreading it with your hands means even coverage, and that even coverage is what gives you a uniformly golden finish.
Press firmly. A flat quesadilla browns evenly. A lumpy one has pale patches and a sad, steamy middle.
Fun Variations
Hot honey drizzle: Finish the baked quesadillas with a little hot honey. Sweet heat against salty, crispy cheese edges is a dangerous combination, and I mean that as a compliment.
Pan chicken quesadillas, oven style: Swap in cooked, minced chicken and season it the same way. Same crunch, zero skillet.
Plain cheese quesadilla: Skip the filling for a simple cheese quesadilla. Same method, great for picky eaters. For another cheese-forward idea, check out this keju gruyere recipe.
Veggie-loaded: Double the black beans and corn, and leave out the meat. The tomato paste and seasoning keep it savory.
Troubleshooting
Soggy middle? The filling was probably too wet or too warm. Cool it fully next time, and cook off extra liquid before it hits the bowl.
Pale tops? Spritz them with a little oil and give them another minute or two. Check that your oven is truly at temperature, too.
Cheese escaping? You overstuffed it. Use less filling, fold tightly, and press the quesadilla flat before baking.
Filling too dry? Add a splash more water while it’s still on the heat. You’re aiming for juicy, not parched.
Storing Crispy Sheet-Pan Oven Quesadillas
Leftovers happen, and they’re honestly pretty great. Follow the USDA’s leftovers guidance and get them into the fridge within 2 hours of baking.
| Method | How to Do It | How Long |
|---|---|---|
| Room temperature | Not recommended. Refrigerate within 2 hours of baking. | 2 hours max |
| Refrigerator | Cool completely, then store in an airtight container with parchment between layers. | 3 to 4 days |
| Freezer | Wrap each quesadilla individually, then place in a freezer bag. | Up to 2 months |
Reheating Tips
Skip the microwave if you can. It turns the crunch to chew. Instead, reheat on a tray in a 200°C / 400°F oven for 8 to 10 minutes, flipping once, until hot and crisp again.
An air fryer works too, and it’s even faster. Whatever method you pick, heat leftovers until they’re steaming hot all the way through.
No-Waste Ideas
Leftover filling is basically a gift. Spoon it over rice for a speedy burrito bowl, stuff it into a baked potato, or scramble it with eggs for breakfast tacos.
Love the beef-and-beans combo? Pabellon criollo is another hearty dinner worth bookmarking. And for a cozy side, these marry me butter beans with spinach make a saucy, satisfying partner.
Got a stray, slightly stale quesadilla wedge? Chop it up and toss it over a salad like a very cheesy crouton.
Frequently Asked Questions
Can I make crispy sheet-pan oven quesadillas ahead of time?
Yes, but only partway. Make the filling up to a day ahead and keep it covered in the fridge, then assemble and bake just before serving. Fully baked quesadillas lose their crunch as they sit, so fresh is best.
What cheese is best for a beef quesadilla?
Cheddar, colby, tasty cheese, or Monterey jack all melt beautifully and bake up golden. Skip mozzarella for this one. Pack the shreds tightly into the measuring cup so every bite gets its fair share.
Can I make pan chicken quesadillas this way instead?
Absolutely. Swap the beef for chicken, turkey, pork, or lamb and follow the same steps. Just make sure poultry is cooked through before it goes into the tortillas, since it’s going to cool and then bake again.
How do I keep my quesadillas from getting soggy?
Keep the filling juicy but not watery, and let it cool for at least 15 minutes before assembling. Rub oil over the top and sides only, press each quesadilla flat, and use a metal tray. Serve them straight from the oven.
Can I freeze leftover quesadillas?
You can. Cool them completely, wrap each one individually, and freeze in a bag for up to 2 months. Reheat from frozen in a hot oven so the tortilla re-crisps instead of steaming.
Final Thoughts: Go Make Them
Now it’s your turn. Make a tray of these crispy sheet-pan oven quesadillas, cut one in half, and listen for that crunch. I promise it’s worth it.
Save this recipe to your Pinterest board so you can find it on a busy night. And tell me in the comments how yours turned out, plus what you dipped them in. I read every single one.
