

This best cottage cheese wrap recipe turns just four pantry staples into a soft, protein-packed wrap you can stuff with basically anything. It’s low-carb, high-protein, and way easier than it sounds.
Okay, real talk: I used to drop way too much money on those fancy store-bought protein wraps until I did the math and felt personally attacked by my own receipt. This cottage cheese wrap recipe fixed that overnight, and now I always have a stack of these chilling in my fridge, ready for whatever sad, half-empty produce drawer situation I’ve got going on. It tastes way fancier than four ingredients has any business tasting.
Table of Contents
Why This Cottage Cheese Wrap Recipe Is About to Become Your New Favorite
So here’s the deal with this cottage cheese wrap recipe: it’s basically a savory, protein-loaded pancake that acts like a tortilla. No flour, no weird gums, no ten-ingredient list. Just cottage cheese, egg, and a little seasoning, baked thin and rolled up with whatever you’re craving.
Cottage cheese is genuinely one of those underrated foods that deserves more love. According to Healthline’s breakdown of cottage cheese benefits, it’s loaded with protein and calcium while staying pretty low in calories, which is exactly why it makes such a solid base for a wrap.
And the egg isn’t just there for texture. Eggs bring their own protein punch and a bunch of nutrients, as Healthline’s look at egg nutrition points out, which makes this cottage cheese wrap recipe feel like an actual meal instead of a sad diet substitute.
Whether you’re meal prepping lunches, trying to eat less bread, or just bored of the same old tortilla, this cottage cheese wrap recipe checks a lot of boxes. It’s flexible, it’s filling, and honestly, it’s kind of fun to make.

Best Cottage Cheese Wrap
Equipment
- Small food processor or blender
- Quarter sheet pan or small baking sheet
- Parchment paper
- cooking spray
- Rubber spatula
- measuring cups
- measuring spoons
Ingredients
Cottage Cheese Wrap Base
- 1 cup cottage cheese full-fat or low-fat both work; drain briefly if very watery
- 1 large egg helps bind the wrap and make it sturdy
- ⅛ tsp salt skip if cottage cheese is already salted
- ¼ tsp Italian seasoning or substitute garlic powder, onion powder, black pepper, smoked paprika, or red pepper flakes
Optional Fillings
- to taste fresh mozzarella torn into small pieces
- 1 handful arugula adds a peppery bite
- a few slices jarred roasted red peppers sweet and smoky
- a few slices cucumber for crunch
- ½ avocado sliced
- to taste salt and pepper for seasoning the fillings
- 1 drizzle balsamic glaze ties the fillings together
- 1 pinch chopped basil fresh and fragrant
Instructions
- Preheat the oven to 350F.
- Add the cottage cheese, egg, salt, and Italian seasoning to a small food processor or blender.
- Blend until completely smooth, with no visible cottage cheese curds. A smooth batter helps the wrap bake evenly and roll without tearing.
- Line a small baking sheet or quarter sheet pan, about 13 by 9 inches, with parchment paper and lightly spray it with cooking spray.
- Pour the batter onto the prepared pan and use a rubber spatula to spread it into a very thin, even layer, working from the center outward.
- Bake for 25 to 35 minutes, or until the top is lightly browned, soft to the touch, and a corner lifts easily from the parchment without sticking.
- Let the wrap cool for about 5 minutes before handling so it firms up and is less likely to tear.
- Layer the wrap with fresh mozzarella, arugula, roasted red peppers, cucumber, avocado, salt, pepper, balsamic glaze, and chopped basil, or use your favorite fillings.
- Roll the wrap up like a burrito and serve.
Notes
What You Need for This Cottage Cheese Wrap Recipe
You only need a handful of ingredients for the wrap itself, and then it’s a free-for-all with fillings. I’ve listed my go-to combo below, but treat it more like inspiration than gospel.
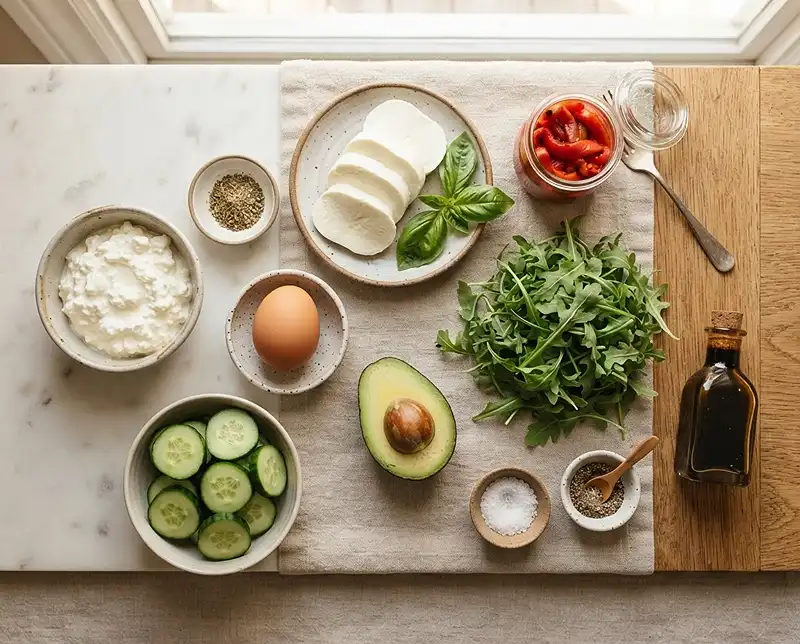
The Wrap Base
| Ingredient | Amount | Notes |
|---|---|---|
| Cottage cheese | 1 cup | Full-fat or low-fat both work fine here |
| Egg | 1 large | Helps everything bind together and bake up sturdy |
| Salt | 1/8 tsp | Skip this if your cottage cheese is already salted |
| Italian seasoning | 1/4 tsp | Sub garlic powder, onion powder, or black pepper if you prefer |
My Favorite Fillings
| Filling | Amount | Notes |
|---|---|---|
| Fresh mozzarella | To taste | Torn into small pieces so it melts nicely |
| Arugula | A handful | Adds a peppery bite |
| Jarred roasted red peppers | A few slices | Sweet, smoky, and no chopping required |
| Cucumber | A few slices | For crunch |
| Avocado | Half, sliced | Creamy contrast to everything else |
| Salt and pepper | To taste | Season your fillings, not just the wrap |
| Balsamic glaze | A drizzle | Ties the whole thing together |
| Chopped basil | A pinch | Fresh and fragrant, don’t skip it if you have it |
Feel free to swap in whatever’s in your fridge. This cottage cheese wrap recipe is basically a blank canvas, so leftover roasted veggies, deli meat, or hummus all work great too.
How to Make This Cottage Cheese Wrap Recipe
Making a cottage cheese wrap is honestly more about patience with the oven than any actual skill. Here’s exactly how I do it, step by step.
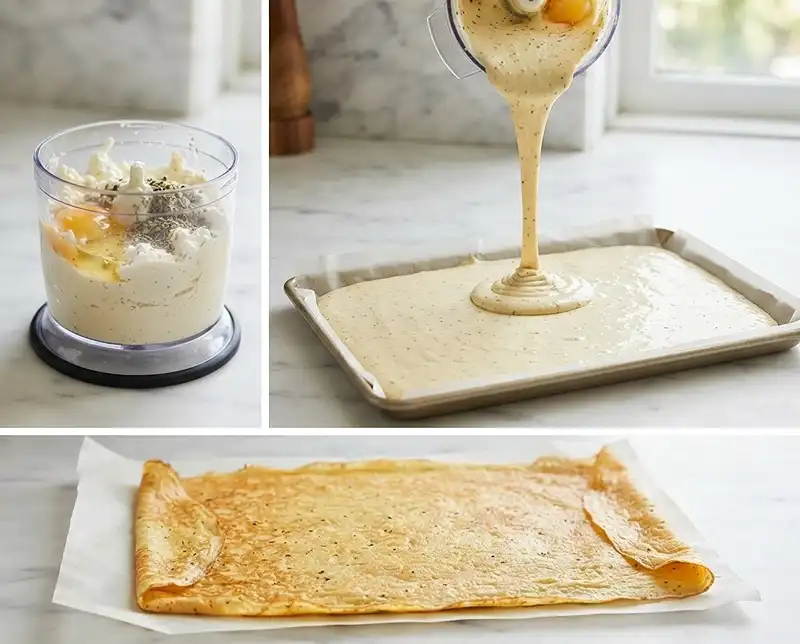
Blend the Batter
Preheat your oven to 350°F first, because timing matters here. Then add the cottage cheese, egg, salt, and seasoning to a small food processor or blender and blend until it’s completely smooth, with no lumps of curd hiding anywhere.
“The smoother the batter, the smoother your wrap,” is basically my mantra here. If you skip blending and leave chunks, your wrap will bake up uneven and tear more easily when you roll it.
Spread It Thin and Bake
Line a small baking sheet with parchment paper and give it a light spray of cooking spray. I use a quarter sheet pan, roughly 13 by 9 inches, which gives you the perfect thin, wrap-sized shape.
Pour the batter onto the pan and spread it into as thin a layer as you can manage, ideally so thin you almost can’t see the parchment through it. This step is the whole secret to a flexible, foldable cottage cheese wrap instead of a thick, crumbly slab.
Bake for 25 to 35 minutes, depending on your oven. Mine usually takes about 30 minutes, and you’ll know it’s done when the top is lightly browned, soft to the touch, and you can easily lift a corner off the parchment without it sticking.
Fill, Roll, and Devour
Let the wrap cool for about 5 minutes before you touch it, because patience now saves you a ripped wrap later. Once it’s cool enough to handle, layer on your fillings and roll it up like a burrito.
I like to load mine with mozzarella, arugula, roasted red peppers, cucumber, avocado, a little salt and pepper, a drizzle of balsamic glaze, and fresh basil. It’s basically a caprese salad decided to become a wrap, and honestly, good for it.
Tips, Variations, and Troubleshooting for Your Cottage Cheese Wraps
Once you’ve made this cottage cheese wrap recipe a couple of times, you’ll start noticing little tweaks that make it even better. Here’s everything I’ve learned from way too many trial batches.
My Best Tips for Success
Use a rubber spatula to spread the batter evenly, working from the center outward. It sounds fussy, but an even layer really is the difference between a wrap that rolls like a dream and one that cracks down the middle.
Let your cottage cheese wraps cool slightly before filling them. Warm wraps are more delicate and tend to tear, while a few minutes of cooling firms them up just enough to hold everything without falling apart.
Fun Ways to Switch Up Your Cottage Cheese Wraps
Craving something heartier? Check out this cottage cheese chicken wrap recipe for a protein-loaded lunch option that fills you up for hours.
If you love the flavor but want something closer to a classic tortilla texture, this cottage cheese tortilla wrap recipe is worth a try too.
Want a sturdier, bread-like version instead? This cottage cheese bread wrap recipe gives you a thicker, chewier base that holds up great to saucier fillings.
And if wraps aren’t even the goal anymore and you’re just craving that same cottage cheese and egg combo in a totally different form, this cottage cheese wrap quiche recipe turns the same base into a cozy baked breakfast.
Troubleshooting Common Wrap Problems
If your wrap cracks when you roll it, it’s usually either too thick or wasn’t cooled long enough before filling. Spread thinner next time and give it that full 5 minutes to rest before you load it up.
If it seems too soft or sticky in the middle, it probably needed a few more minutes in the oven. Every oven runs a little different, so don’t be afraid to add 5 more minutes if the top isn’t fully browned yet.
If the batter looks watery instead of smooth, your cottage cheese might have been extra watery to start. Try draining it slightly in a fine mesh strainer for a few minutes before blending.

How to Store and Reheat Cottage Cheese Wraps
These cottage cheese wraps hold up nicely for meal prep, which honestly might be my favorite thing about them. Here’s how to keep them fresh.
| Storage Method | How Long | Notes |
|---|---|---|
| Refrigerator, unfilled | 3 to 4 days | Store in an airtight container with parchment between layers |
| Refrigerator, filled | 1 to 2 days | Best if fillings are dry or low-moisture |
| Freezer, unfilled | Up to 1 month | Freeze flat with parchment between each wrap |
To reheat, a quick 20 to 30 seconds in the microwave brings unfilled wraps right back to soft and pliable. You can also warm them in a dry skillet over low heat for a slightly firmer texture.
For a no-waste kitchen tip, save any leftover roasted red peppers or extra basil from your fillings and toss them into scrambled eggs the next morning. It’s a small move, but it keeps flavors from going to waste and stretches your grocery haul a little further.
If you’re already into high-protein breakfasts like this one, you’ll probably love this high-protein cottage cheese breakfast bowl too. It’s a great way to use up extra cottage cheese without making another batch of wraps.
Best Cottage Cheese Wrap Recipe FAQs
Can I make this cottage cheese wrap recipe ahead of time?
Yes, definitely. Bake the wraps, let them cool completely, and store them unfilled in the fridge for up to 4 days so you can fill them fresh whenever you’re ready to eat.
Can I use low-fat cottage cheese instead of full-fat?
Absolutely, both work well in this cottage cheese wrap recipe. Low-fat cottage cheese will give you a slightly lighter texture, while full-fat makes the wrap a touch richer.
Why is my cottage cheese wrap falling apart when I roll it?
This usually happens if the wrap was spread too thick or wasn’t cooled enough before filling. Spread the batter thinner next time and let it rest for the full 5 minutes before rolling.
Can I freeze cottage cheese wraps?
Yes, unfilled wraps freeze well for up to a month if you layer them with parchment paper. Thaw them in the fridge overnight before filling and enjoying.
What other seasonings work well in cottage cheese wraps?
Garlic powder, onion powder, smoked paprika, or even a pinch of red pepper flakes all work great instead of Italian seasoning. Adjust to match whatever fillings you’re planning to use.
Final Thoughts
Honestly, this best cottage cheese wrap recipe is one of those things that sounds too simple to be good, but then you take a bite and immediately start planning your next batch. It’s protein-packed, endlessly customizable, and way cheaper than buying wraps at the store.
Give this cottage cheese wrap recipe a try this week and see for yourself how easy it is to make cottage cheese wraps part of your regular rotation. If you loved it, snap a picture, save it to Pinterest, and let me know in the comments what fillings you went with.
