
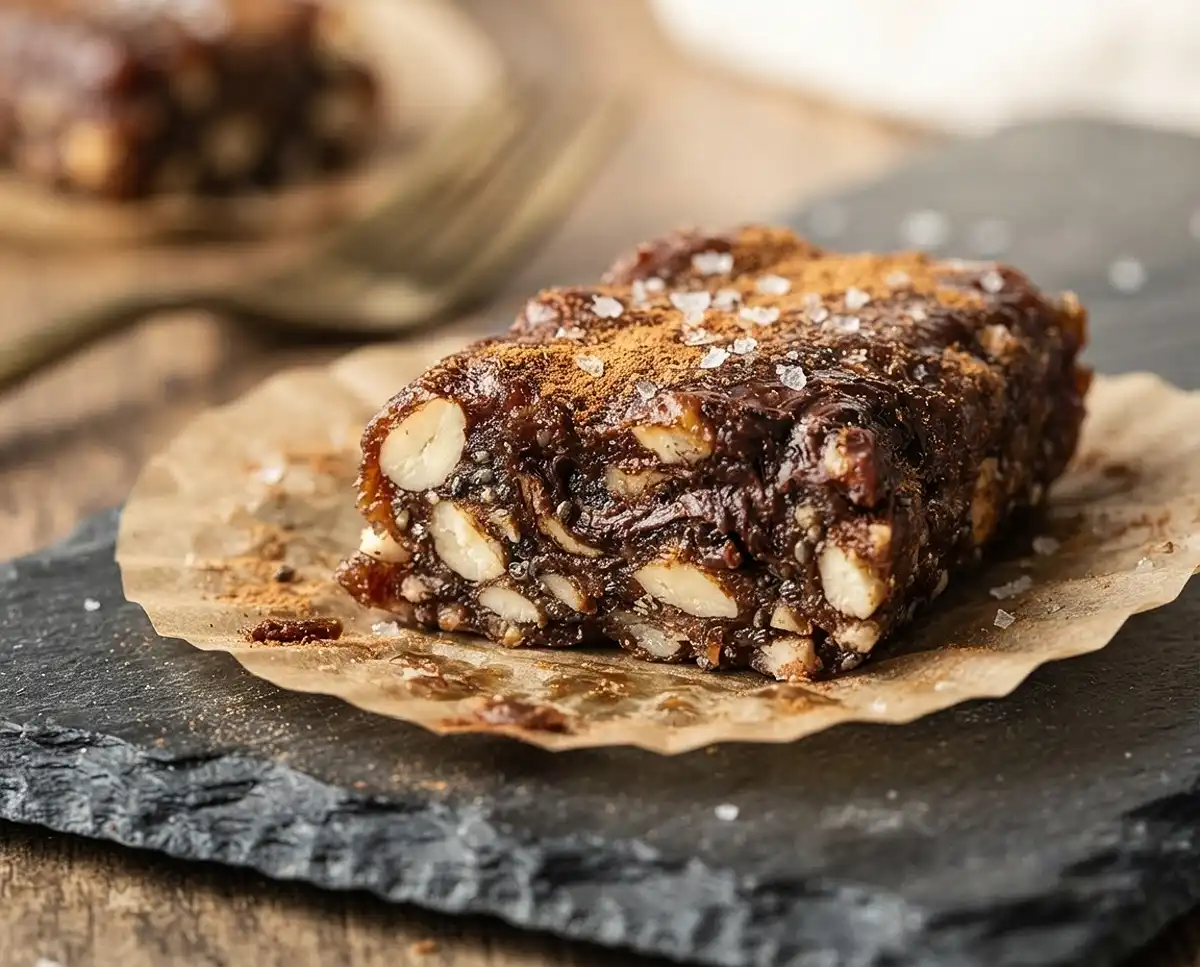
This date palm recipe has been my go-to snack fix for years — sticky, rich, and honestly way more satisfying than anything wrapped in plastic at a gas station. The best part? No oven, no fuss, just real ingredients doing their thing.
Table of Contents
What These Date Bars Are All About
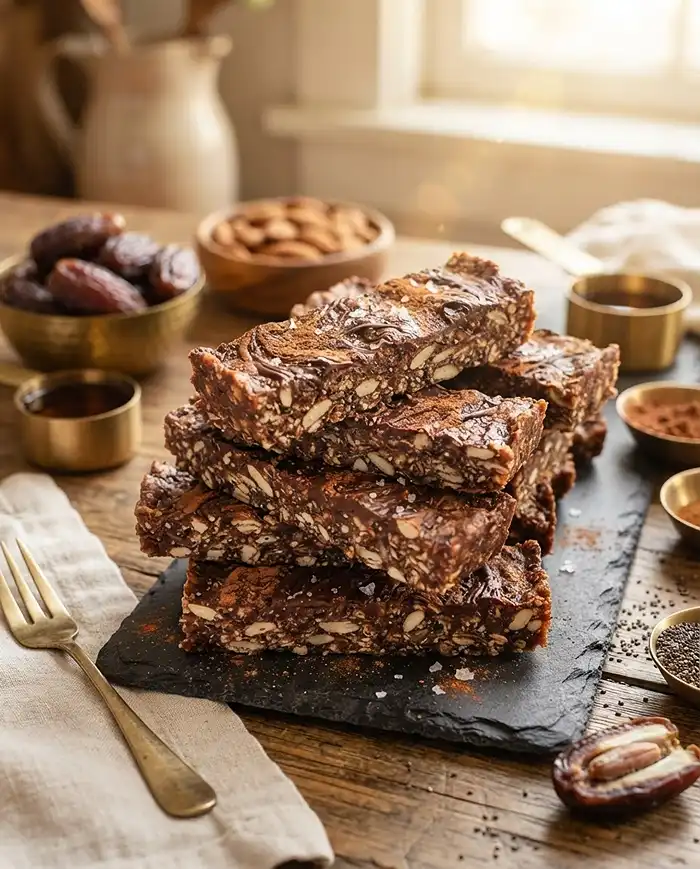
These no-bake date palm bars are chewy, chocolatey, and packed with natural sweetness from medjool dates. They’re held together with peanut butter and layered with warm cinnamon and a hint of cocoa.
Think of them as a healthier energy bar that actually tastes like a treat. They hold together beautifully, slice clean, and disappear fast from any snack plate.
Whether you’re after a midday energy boost, a post-workout bite, or something to satisfy that 3 p.m. chocolate craving, these bars have you covered — no guilt required.
Date Palm No-Bake Bars
Equipment
- Food processor
- Small baking pan or loaf tin
- Parchment paper
- spatula
- Sharp knife
Ingredients
- 2 cups Medjool dates, pitted About 12 to 14 large; soft and sticky
- 1 cup Raw almonds or walnuts Walnuts give a richer, earthier bite
- 2 tablespoons Natural peanut butter No added sugar keeps it clean
- 1 teaspoon Cinnamon Warm and aromatic
- ¼ teaspoon Sea salt Balances the sweetness
- 1 tablespoon Maple syrup Optional; add if your dates are on the drier side
- 2 tablespoons Cocoa powder Optional; for a chocolate date palm twist
- 1 tablespoon Chia seeds Optional; adds fiber and a subtle crunch
Instructions
- Line a small baking pan or loaf tin with parchment paper, letting the edges hang over the sides so you can lift the finished slab out easily later.
- Check your dates. If they feel dry or stiff, soak them in warm water for about 10 minutes, then drain completely. Soft dates blend into a smooth, sticky paste that holds everything together, while dry dates leave you with a crumbly mess.
- Add the almonds or walnuts to the food processor and pulse until they look like coarse breadcrumbs. Do not over-process; those little nut bits give each bar a satisfying crunch.
- Add the pitted dates, peanut butter, cinnamon, sea salt, and maple syrup (if using). Pulse until the mixture clumps into a sticky, uniform paste and pulls away from the sides of the bowl.
- Sprinkle in the cocoa powder and chia seeds and give it just one or two quick pulses. You want a swirl of chocolate marbled through the date paste rather than a fully incorporated, uniformly dark mixture.
- Transfer the sticky mixture to the parchment-lined pan. Using a spatula or clean, slightly damp hands, press it into an even layer about 1 inch thick. Pack it firmly for cleaner, more uniform slices.
- Cover the pan and refrigerate for at least 1 hour so the date caramel firms up around the nuts. Overnight chilling works even better. Do not slice before chilling or the bars will squish.
- Lift the whole slab out using the parchment edges, place it on a cutting board, and slice into 8 to 10 bars with a sharp knife. Run the knife under warm water between cuts for cleaner edges.
Notes
Ingredients
Everything here is wholesome and pantry-friendly. Here’s a breakdown of what you’ll need:
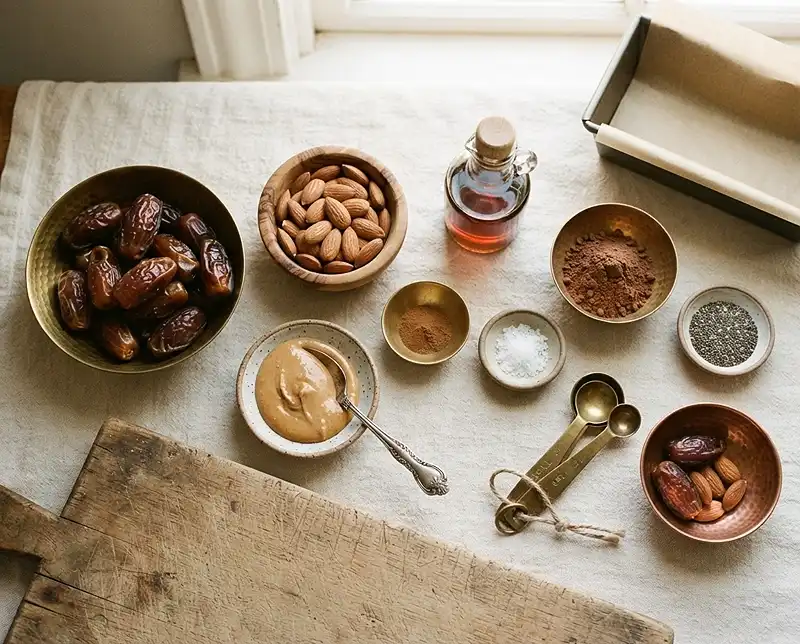
| Category | Ingredient | Amount | Notes |
|---|---|---|---|
| Base | Medjool dates, pitted | 2 cups (about 12–14 large) | Soft and sticky — the star of the show |
| Base | Raw almonds or walnuts | 1 cup | Walnuts give a richer, earthier bite |
| Flavor | Natural peanut butter | 2 tablespoons | No added sugar — keeps it clean |
| Flavor | Cinnamon | 1 teaspoon | Warm and aromatic |
| Flavor | Sea salt | 1/4 teaspoon | Balances all the sweetness |
| Optional Extras | Maple syrup | 1 tablespoon | Add if your dates are on the drier side |
| Optional Extras | Cocoa powder | 2 tablespoons | For a chocolate date palm twist |
| Optional Extras | Chia seeds | 1 tablespoon | Adds fiber and a subtle crunch |
Medjool dates are the gold standard here. They’re naturally caramel-like and soft enough to blend without much coaxing. If you can only find Deglet Noor dates, they work too — just soak them a bit longer. Learn more about the nutritional benefits of medjool dates and why they’re such a powerhouse ingredient.
How to Make This Date Palm Recipe
No baking, no thermometers, no stress. A food processor does the heavy lifting here. Let’s walk through it step by step.
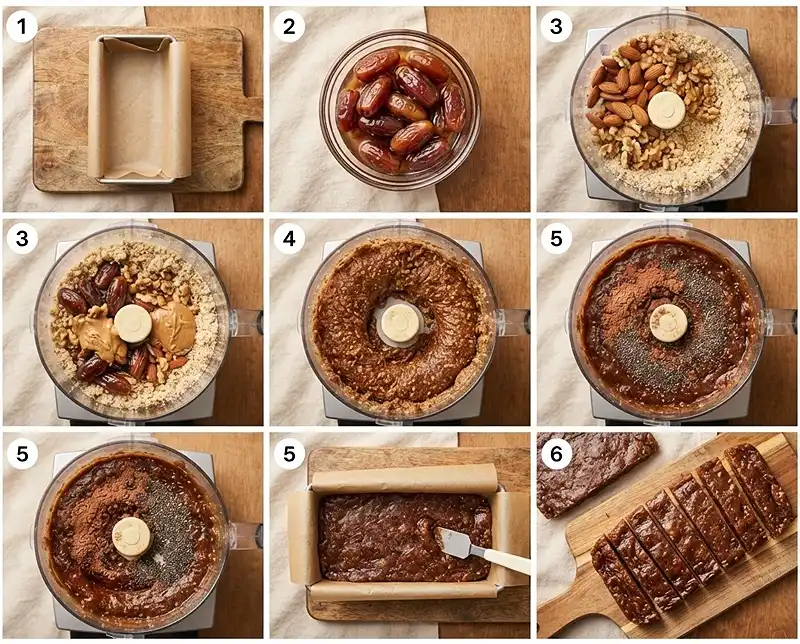
Step 1: Prep Your Pan
Line a small baking pan or loaf tin with parchment paper. Let the edges hang over the sides — this makes lifting the slab out later so much easier. Think of it as your little date bar hammock.
Step 2: Soften the Dates
Give your dates a squeeze. If they feel dry or stiff, soak them in warm water for about 10 minutes, then drain completely. Soft dates blend into a smooth, sticky date paste that holds everything together.
Skipping this step with dry dates will leave you with a crumbly mess instead of that gorgeous chewy texture. Don’t rush it.
Step 3: Pulse the Nuts
Drop your almonds or walnuts into the food processor and pulse until they look like coarse breadcrumbs. Don’t go too far — you want some texture in there. Those little nut bits are what give each bar that satisfying crunch.
Step 4: Bring in the Dates and Flavors
Add the pitted dates, peanut butter, cinnamon, sea salt, and maple syrup (if using). Pulse the whole thing until it clumps into a sticky, uniform paste. You’ll know it’s ready when the mixture pulls away from the sides of the bowl.
It smells incredible at this point — warm, nutty, and almost caramel-like. That’s the natural date sweetness doing its magic.
Step 5: Add Cocoa and Chia Seeds
Sprinkle in the cocoa powder and chia seeds. Give it just one or two quick pulses. You’re not trying to fully incorporate them — a swirl of chocolate through the date paste is exactly what you’re going for.
Overmixing here makes everything turn uniformly dark brown, which is fine flavor-wise but loses that pretty marbled look.
Step 6: Press Into the Pan
Transfer the sticky mixture into your parchment-lined pan. Use a spatula or just clean, slightly damp hands to press it into an even layer about 1 inch thick.
Press firmly. The tighter you pack it, the cleaner and more uniform your slices will be. This is one of those moments where extra effort pays off at the table.
Step 7: Chill Until Set
Cover the pan and refrigerate for at least 1 hour. The cold firms up the date caramel around the nuts so you get that perfect chewy-but-sturdy bite. Don’t try to slice them before chilling — they’ll just squish.
Overnight chilling works even better if you’ve got the patience for it.
Step 8: Slice and Enjoy
Lift the whole slab out using the parchment paper edges. Place it on a cutting board and slice into 8–10 bars with a sharp knife. Run the knife under warm water between cuts for cleaner edges.
That first slice revealing all those layers of date, nut, and cocoa swirl? Genuinely satisfying every single time.
Expert Tips, Variations, and Troubleshooting
Tips for the Best Date Palm Bars
Use a sharp chef’s knife for slicing — a dull blade will drag and squish the bars instead of cutting through cleanly. Warm water on the blade between cuts helps a lot.
If the mixture is sticking to your hands during pressing, wet your fingertips lightly. Just a tiny bit of water makes a big difference without changing the texture of the bars.
Taste the mixture before pressing it into the pan. If it needs more sweetness, a drizzle of maple syrup stirred in fixes it immediately. If it feels too sweet, a pinch of extra sea salt balances things right out.
Delicious Variations to Try
Coconut date bars: Roll the finished bars in shredded unsweetened coconut before refrigerating. It adds chew and a tropical note that pairs beautifully with the date sweetness.
Spiced date bars: Add a pinch of cardamom and a tiny grate of fresh ginger alongside the cinnamon. The result is warming and complex — almost like a Middle Eastern dessert.
Protein-boosted version: Stir in a tablespoon of your favorite vanilla protein powder with the cocoa. It blends right in and makes these bars even more filling as a post-workout snack.
If you love easy make-ahead treats, check out this Hawaiian bread French toast bake — it’s another crowd-pleaser that does all the work the night before.
What to Do If Things Go Wrong
Mixture too dry: Add maple syrup or a splash of water, one teaspoon at a time, and pulse again. It should come together within a few extra pulses.
Mixture too wet and sticky: Add a small handful of oats or extra nuts and pulse briefly. They’ll absorb the excess moisture and bring the texture back into balance.
Bars falling apart after slicing: They probably needed more time in the fridge. Pop the cut bars back in for another 30 minutes and they’ll firm right up.
Storage Instructions
These bars store really well, which makes them perfect for meal prepping snacks ahead of the week. Here’s how to keep them fresh:
| Storage Method | Container | Duration |
|---|---|---|
| Refrigerator | Sealed airtight container | Up to 2 weeks |
| Freezer | Freezer bag or container with parchment between layers | Up to 3 months |
| Room Temperature | Sealed container, cool spot | Up to 3 days |
Reheating and No-Waste Ideas
These bars are best enjoyed cold or at room temperature — no reheating needed. If frozen, just pull one out and let it thaw on the counter for 10–15 minutes before eating.
Got crumbles left over from cutting? Don’t toss them. Sprinkle date bar crumbles over yogurt, oatmeal, or a smoothie bowl for an instant topping that’s basically free granola. Pair it with a side of fresh and crunchy broccoli salad for a balanced, satisfying lunch spread.
You can also press leftover crumbles into a mini muffin tin, chill them, and pop out little energy bites. Same flavors, totally different snackable shape — and they look adorable on a platter.
Looking for more easy make-ahead recipes? This Mount Olive bread and butter pickles recipe is another great fridge staple that’s ready when you are.
Frequently Asked Questions
Can I use a different nut butter instead of peanut butter?
Absolutely. Almond butter, cashew butter, or sunflower seed butter all work great in this date palm recipe. Just make sure it’s natural with no added sugar or oils, so the texture stays right and the bars hold together properly.
Do I need a food processor, or can I make these by hand?
A food processor makes this recipe much easier, but you can do it without one. Chop the dates very finely by hand until they form a rough paste, then mix everything together in a bowl. It takes more elbow grease, but the bars turn out just as delicious.
Are these date bars suitable for vegans?
Yes, this date palm recipe is completely vegan as written. All the ingredients are plant-based. Just double-check your peanut butter and maple syrup labels if you’re being strict, as some brands add honey or dairy-based additives.
Can I add oats to the mixture?
You can! Add half a cup of rolled oats when you pulse the nuts for a chewier, more substantial bar. They also help absorb any extra moisture if your dates are particularly soft, which can make the bars easier to slice.
How do I know when the bars are set enough to slice?
After at least one hour in the fridge, press the surface gently with your finger. If it feels firm and holds its shape without sticking, it’s ready to slice. If it still feels soft or tacky, give it another 30 minutes before cutting.
Give This Date Palm Recipe a Try
Honestly, once you make this date palm recipe once, it becomes a regular rotation. It’s the kind of snack that earns compliments every time you bring it somewhere — and nobody believes it took less than 15 minutes of active work.
If you try these bars, I’d love to hear how they turned out for you. Drop a comment below and let me know if you added your own twist. And if you enjoyed this recipe, please share it on Pinterest — it helps more people find wholesome, no-bake recipes like this one.
Happy snacking — and may your dates always be soft and your bars always slice clean.
