
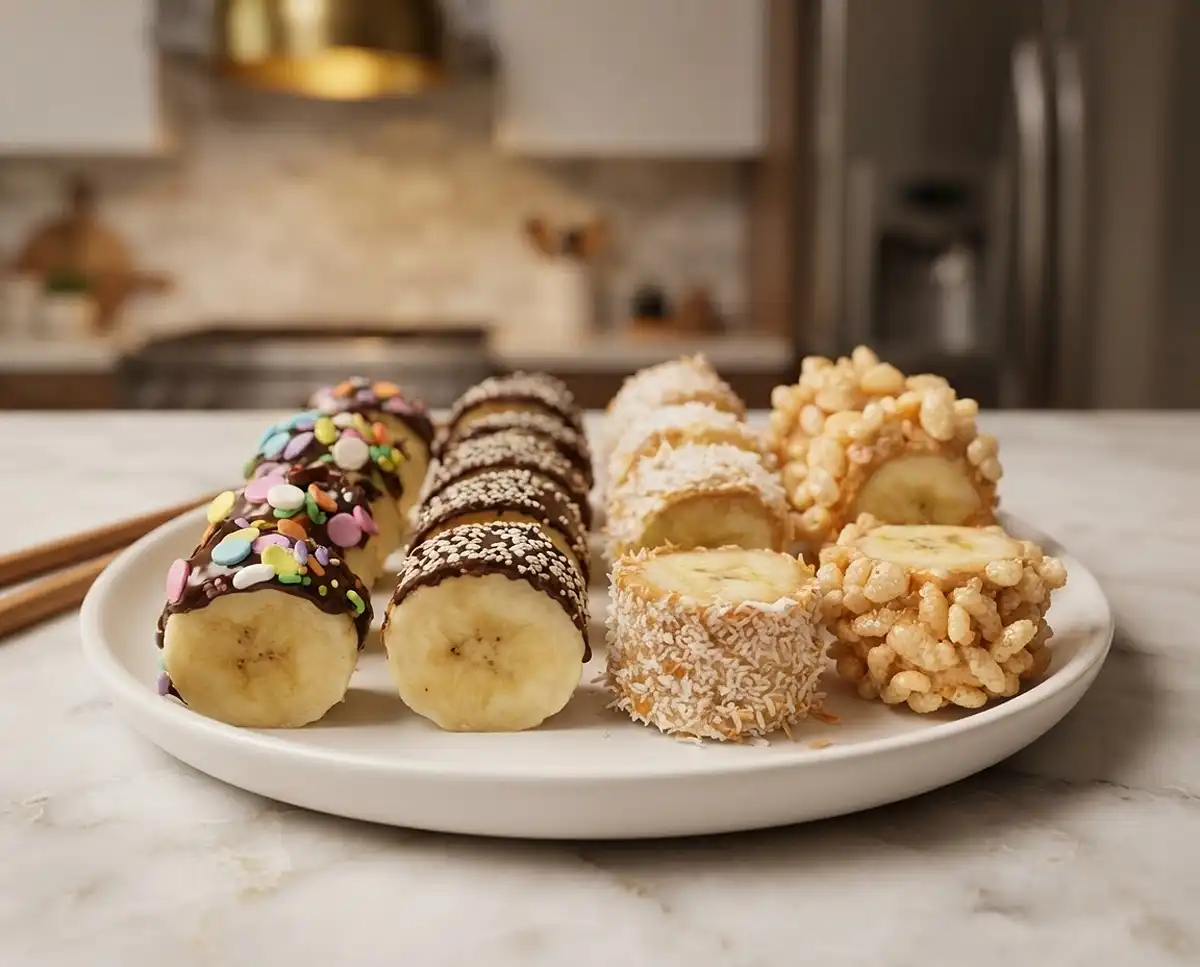
Banana sushi is the snack you never knew you needed, and honestly, once you try it, you’ll wonder how you lived without it. It’s fun, it’s ridiculously easy, and it looks way more impressive than the effort it takes.
I started making these for my little ones on a lazy Sunday afternoon, and within five minutes, everyone at the table was fighting over the last rice krispie roll. Consider yourself warned.
Table of Contents
What Is Banana Sushi?
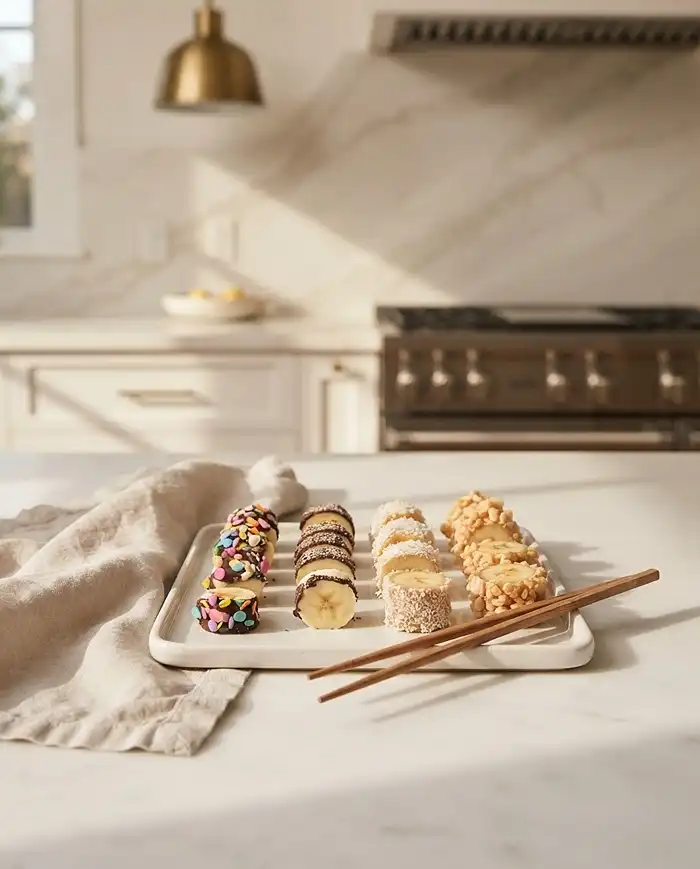
Banana sushi is exactly what it sounds like — banana “rolls” dressed up with fun toppings like melted chocolate, sprinkles, chia seeds, nut butter, coconut, or rice krispies.
There’s no raw fish, no seaweed, and no culinary degree required. It’s a playful twist on the classic sushi look, made entirely from wholesome, kid-approved ingredients.
These little bites come together in under 10 minutes and are perfect as an after-school snack, a party treat, or honestly, a sneaky healthy dessert.
Why You’ll Love This Recipe
First off, it’s genuinely fun to make. Kids love rolling bananas in toppings, and the results look adorable on a plate — like a real sushi platter, minus the intimidation.
It’s also incredibly flexible. You can go the chocolate-and-sprinkles route for a treat vibe, or keep it healthy banana sushi style with nut butter and chia seeds for something more nutritious.
Either way, you’re working with whole, recognizable ingredients. No artificial flavors, no mystery additives — just good stuff.
Banana Sushi
Equipment
- Cutting board
- Sharp knife
- Microwave-safe bowl
- Small bowls for toppings
- Plate or platter
Ingredients
- 1 Banana Ripe but firm
- 2 squares Dark chocolate Or milk/white chocolate
- 1 tablespoon Sprinkles
- 1 Banana Ripe but firm
- 2 squares Dark chocolate
- ½ tablespoon Chia seeds
- 1 Banana Ripe but firm
- 1 ½ tablespoons Nut butter Almond, peanut, or sunflower seed butter for nut-free
- 1 ½ tablespoons Shredded coconut
- 1 Banana Ripe but firm
- 1 ½ tablespoons Nut butter Almond, peanut, or sunflower seed butter for nut-free
- 3 tablespoons Rice krispies
Instructions
- Peel all the bananas and lay them on a clean plate or chopping board. Keep them whole for now; you will slice them into rounds after the toppings are on and set.
- For the Sprinkles and Chia Seed varieties, melt 2 squares of dark chocolate per banana in the microwave in 30-second bursts, stirring between each, until smooth. Pour the chocolate over the top of each banana, then immediately scatter on the sprinkles or chia seeds before it sets.
- Place the chocolate-coated bananas in the fridge until the chocolate is fully firm, about 15 to 20 minutes.
- For the Coconut and Rice Krispie varieties, spread the nut butter generously along the top of each banana, then roll or press it into a shallow bowl of shredded coconut or rice krispies until well coated. These are ready instantly; serve the rice krispie version right away while it is crispy.
- Once the chocolate ones are set, slice all the bananas into rounds about 2 to 3 cm thick, like sushi rolls. Arrange on a platter and serve.
Notes
Ingredients You’ll Need
Below are the four flavor combinations, each using just a handful of pantry staples. Mix and match them on the same platter for a proper banana sushi spread.
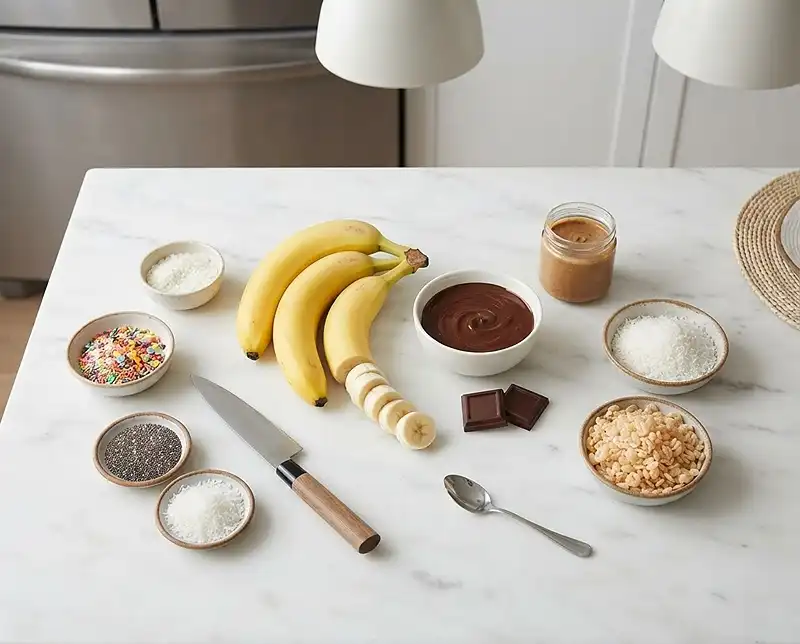
| Variety | Ingredients | Quantity |
|---|---|---|
| Sprinkles Sushi | Banana | 1 |
| Dark chocolate squares | 2 squares | |
| Sprinkles | 1 tbsp | |
| Chia Seed Sushi | Banana | 1 |
| Dark chocolate squares | 2 squares | |
| Chia seeds | 0.5 tbsp | |
| Coconut Sushi | Banana | 1 |
| Nut butter | 1.5 tbsp | |
| Shredded coconut | 1.5 tbsp | |
| Rice Krispie Sushi | Banana | 1 |
| Nut butter | 1.5 tbsp | |
| Rice krispies | 3 tbsp |
Ingredient notes: Use ripe but firm bananas — too mushy and they’ll fall apart when you slice them. For nut butter, almond or peanut both work great. If you’re making this for a nut-free household, sunflower seed butter is a brilliant swap.
How to Make Banana Sushi
Learning how to make banana sushi is almost too easy. There’s no oven, no stovetop fuss, and barely any cleanup. Here’s how to bring all four varieties to life.
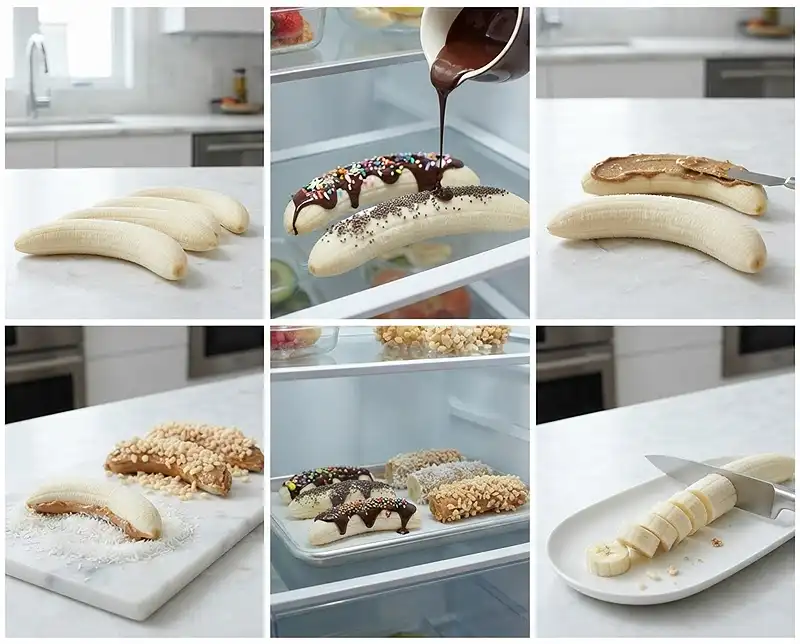
Step 1: Prep Your Bananas
Peel all your bananas and lay them on a clean plate or chopping board. Keep them whole for now — you’ll slice them into sushi-style rounds after the toppings are on and set.
Tip: If you want cleaner slices at the end, pop the dressed bananas in the fridge for 10-15 minutes before cutting. It makes a noticeable difference.
Step 2: Make the Chocolate Varieties
For the Sprinkles Sushi and Chia Seed Sushi, start by melting your dark chocolate. Two squares per banana is all you need — you can do this in a microwave in 30-second bursts, stirring between each.
Once melted and smooth, pour the chocolate over the top of each banana. Then immediately scatter your sprinkles or chia seeds on top before the chocolate sets.
Place the chocolate-coated bananas in the fridge and leave them until the chocolate is fully firm. This usually takes about 15-20 minutes.
Note: Dark chocolate gives a slightly bittersweet contrast to the sweet banana — really lovely. But if you’re making this as banana sushi for kids who prefer milk chocolate, go ahead and swap it in.
Step 3: Make the Nut Butter Varieties
For the Coconut Sushi and Rice Krispie Sushi, there’s no waiting involved — these are ready instantly.
Spread the nut butter generously along the top of each banana. Then roll or press the banana into a shallow bowl of shredded coconut or rice krispies until well coated.
The nut butter acts like a natural glue, and the toppings stick beautifully. Serve these straight away while the rice krispies are still crispy.
Step 4: Slice and Serve
Once the chocolate ones are set, slice all your bananas into rounds — about 2-3 cm thick, just like sushi rolls. Arrange them on a platter and serve.
They look stunning all laid out together. If you’re hosting, put them on a dark slate board for that full sushi-restaurant aesthetic. Your guests will do a double-take, guaranteed.
Expert Tips for the Best Banana Sushi
Pick the Right Bananas
Slightly underripe bananas hold their shape much better when sliced. A banana that’s too ripe will turn mushy and the rounds won’t look as neat. Aim for yellow with just a few small spots.
Melt Chocolate Carefully
Avoid overheating the chocolate — burnt chocolate seizes up and won’t pour smoothly. Low and slow in the microwave (30-second bursts, stirring each time) is the move. You can also use a double boiler if you prefer more control.
Add Toppings Fast
Once the melted chocolate goes on, your window to add sprinkles or chia seeds is short. Have your toppings ready in a small bowl before you start pouring so you can scatter them on immediately.
Make It a Group Activity
This recipe is genuinely one of the best ones to make with kids. Set up a little topping station and let them choose their own combinations. It’s a great way to get them excited about food without any stress.
Variations and Creative Twists
Once you’ve nailed the basics, there’s so much room to play. Here are a few ideas to keep things interesting.
Swap the Chocolate
White chocolate works beautifully with the sprinkles version — it gives a sweeter, creamier base that kids tend to love. You could also try a drizzle of lotus-inspired flavors for a more grown-up twist.
Try Different Nut Butters
Cashew butter is creamier and milder than peanut butter, which makes it great for the coconut version. Tahini is another option if you want something a bit more complex in flavor.
Add a Natural Sweetener Drizzle
A thin drizzle of date syrup over the nut butter varieties adds a gorgeous caramel-like depth. Check out this date palm recipe if you want to make your own at home — it’s easier than you’d think.
Mix Up the Crunchy Toppings
Instead of rice krispies, try crushed graham crackers, granola, or even finely chopped roasted nuts. They all give that satisfying crunch and pair perfectly with the creamy nut butter.
Make It Seasonal
Around the holidays, use red and green sprinkles for a festive version. In summer, crushed freeze-dried strawberries on the chocolate version look stunning and taste incredible.
Troubleshooting Common Issues
Chocolate Won’t Stick Evenly
This usually happens if the chocolate is too thick. Add a tiny drop of coconut oil to the melted chocolate and stir — it thins it out and makes it pour much more smoothly over the banana.
Banana Keeps Sliding Around When Slicing
Make sure the banana is fully chilled before slicing, especially the chocolate varieties. A cold, firm banana is so much easier to cut cleanly. Use a sharp knife and a gentle sawing motion rather than pressing straight down.
Rice Krispies Going Soggy
The rice krispies version needs to be served immediately after assembling. If you leave it sitting for too long, the moisture from the banana softens the cereal. Make these last and plate them right before serving.
Storage Instructions
| Method | Duration | Notes |
|---|---|---|
| Refrigerator (chocolate varieties) | Up to 24 hours | Store in an airtight container. Slice just before serving. |
| Refrigerator (nut butter varieties) | Best eaten same day | Toppings absorb moisture and lose texture overnight. |
| Freezer | Not recommended | Banana texture becomes mushy after thawing. |
Reheating: These are a no-heat snack, so no reheating needed. If your chocolate varieties have been in the fridge, just let them sit at room temperature for 2-3 minutes before serving so they’re not ice cold.
No-waste ideas: Got overly ripe bananas left over? They’re perfect for smoothies or baking. Try blending them with a spoonful of nut butter and some ice for a quick five-minute milkshake — inspired by flavors like this Earl Grey syrup recipe that pairs beautifully with banana-based drinks.
Frequently Asked Questions
Is banana sushi healthy?
It can absolutely be a healthy snack, depending on the toppings you choose. The chia seed and coconut versions are packed with natural goodness. Dark chocolate adds antioxidants, and nut butter brings in protein and healthy fats. Even the sprinkles version is better than most processed snacks, since the base is just a whole banana.
Can I make banana sushi ahead of time?
The chocolate varieties (sprinkles and chia seed) can be prepped up to 24 hours in advance and stored in the fridge. The nut butter versions are best made fresh, as the rice krispies and coconut toppings can go soft overnight. Slice them all just before serving for the neatest results.
Is banana sushi for kids safe for nut allergies?
The coconut and rice krispie versions use nut butter, so they’re not suitable for nut allergies as written. However, you can easily swap in sunflower seed butter or pumpkin seed butter as a safe alternative. The chocolate varieties are naturally nut-free as long as your chocolate brand is too — always check the label.
What type of banana works best?
A slightly underripe, firm banana gives the cleanest slices and holds its shape best. Avoid overripe bananas as they tend to go mushy when cut, especially after the chocolate has set on top.
Can I use white chocolate instead of dark?
Absolutely! White chocolate works wonderfully, especially for the sprinkles version. It creates a sweeter, creamier coating that kids tend to love. Just melt it the same way as dark chocolate, in short microwave bursts, and use it as a direct substitute.
Final Thoughts
Banana sushi is one of those recipes that proves you don’t need complicated ingredients or hours in the kitchen to make something genuinely impressive and delicious.
With four flavor options to choose from, there’s something for every taste — whether you’re after a fun treat for the kids or a quick, healthy banana sushi snack for yourself.
Give it a try and let me know which variety becomes your household favorite. Drop your thoughts in the comments below — I’d love to hear how yours turned out!
And if you loved this recipe, please share it on Pinterest so more people can discover just how easy and fun banana sushi really is. Your saves and shares mean the world and help this little blog keep growing. Thank you!
