
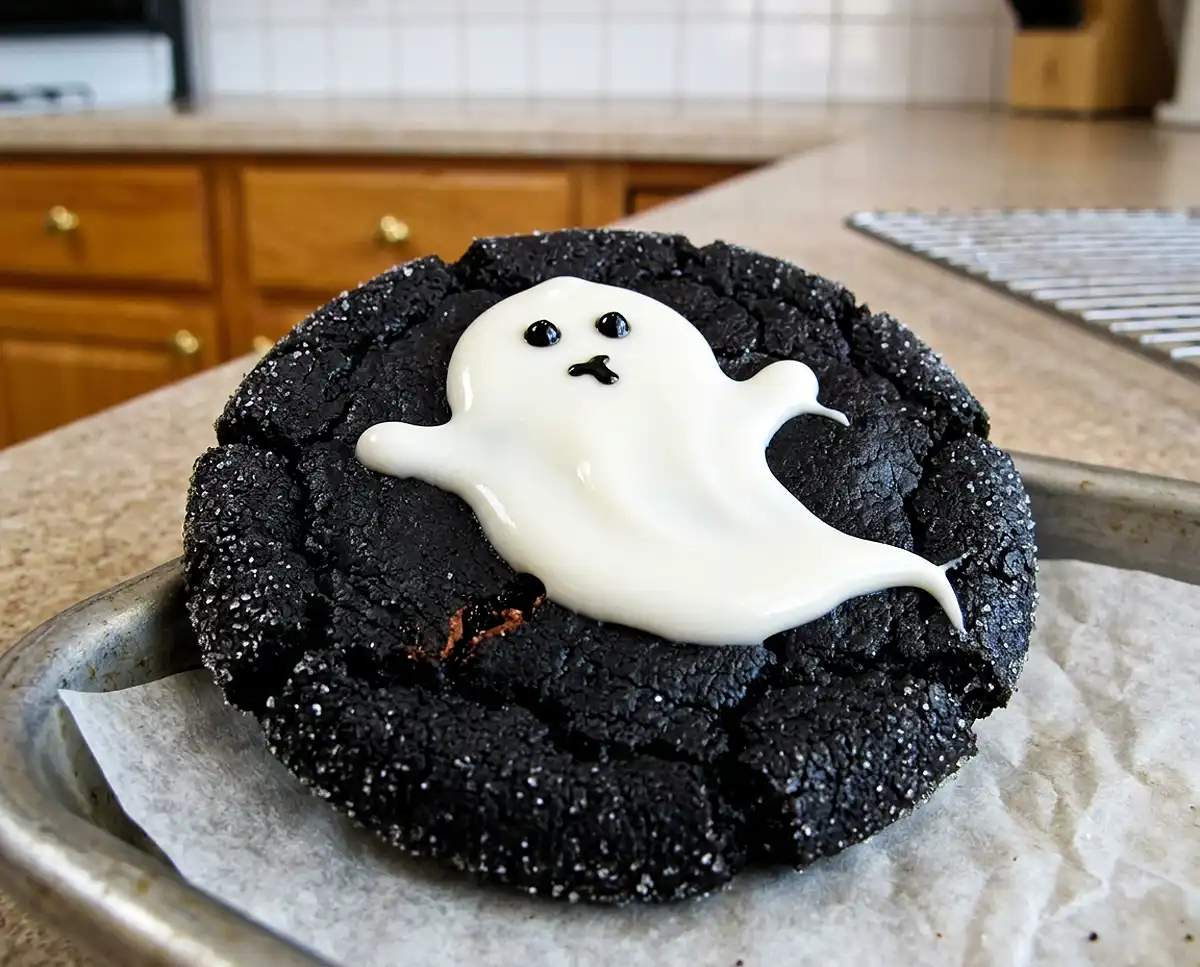
Ghost cookies with a fudgy black cocoa base and a white chocolate ganache ghost on top. You’ll want to make them again. Tap in for the full recipe!
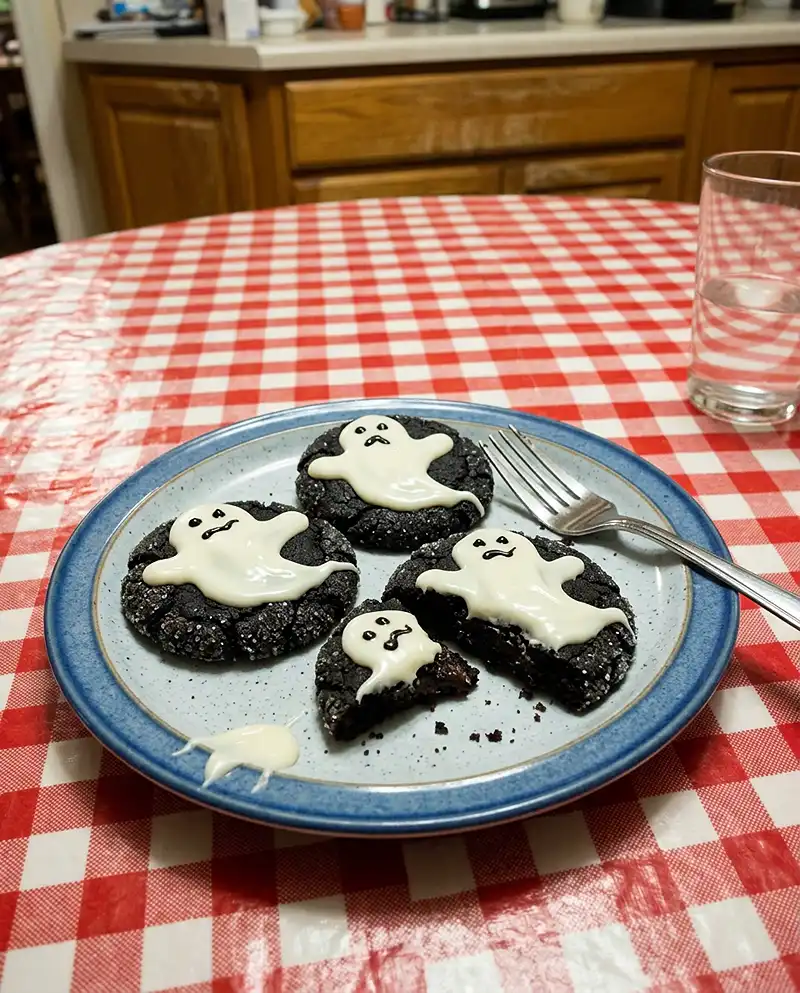
Confession time: I made these ghost cookies as a one-time Halloween thing, then made them four more times before October ended. Tiny white spirits floating on a midnight-black cookie? Adorable. The taste? Think brownie meets fudge truffle. My family now treats this recipe like a seasonal law.
Table of Contents
Here’s the Deal With These Ghost Cookies
These ghost cookies start with black cocoa powder, which gives you that dramatic, Oreo-dark color and a deep, almost-bittersweet chocolate flavor. The edges bake up soft and the centers stay fudgy. Rolling the dough in sugar adds a tiny sparkly crackle on top.
Then comes the fun part. A dollop of creamy white chocolate ganache gets dragged into a ghost shape with a toothpick, complete with a wavy tail and two little arms. A few dots of black gel and boom, you’ve got a spooky icing face.
Why You’ll Keep Making Them
The contrast is the whole magic trick. Bitter dark cookie, sweet creamy white chocolate. It’s like a tiny haunted yin and yang.
They also look way more impressive than the effort involved. Guests will assume you took a class. You did not. You used a toothpick.
Ghost Cookies with Fudgy Black Cocoa and White Chocolate
Equipment
- Medium bowl
- mixing bowls
- Whisk
- Electric mixer
- 2 cookie sheets
- Parchment paper
- Small cookie scoop (1 ounce / about 1 tablespoon)
- Cooling rack
- Small saucepan
- teaspoon
- Toothpicks
Ingredients
Black Cocoa Cookies
- 1 ⅓ cups all-purpose flour
- ¼ tsp baking powder
- ¼ tsp baking soda
- ½ tsp salt
- ½ cup black cocoa powder regular cocoa works but bakes up brown
- ½ cup unsalted butter melted and cooled
- ¾ cup brown sugar packed, light or dark
- ¼ cup white granulated sugar
- 1 tsp alcohol-free vanilla flavoring replaces pure vanilla extract
- 1 large egg room temperature
- 1 egg yolk room temperature
For Rolling the Dough
- ⅓ cup white granulated sugar
White Chocolate Ganache
- 1 cup white chocolate chips good quality, with real cocoa butter
- ⅓ cup heavy cream
- 2 to 4 drops white food dye optional, for brighter ghosts
For the Faces
- 1 tube black writing gel
Instructions
- In a medium bowl, gently whisk the flour, black cocoa powder, baking soda, baking powder, and salt. Set aside. Pro Tip: Black cocoa is very fine and floats everywhere, so whisk gently.
- In a separate bowl, beat the melted butter, brown sugar, and 1/4 cup granulated sugar on high speed for 2 minutes, until thick and glossy. Add the vanilla flavoring, egg, and egg yolk and mix on medium just until combined. Add the dry ingredients on low speed and mix just until combined.
- Preheat the oven to 350°F and line 2 cookie sheets with parchment. Let the dough rest 10 minutes.
- Put the 1/3 cup granulated sugar in a bowl. Scoop the dough with a small cookie scoop (1 ounce, about 1 tablespoon), roll each ball in the sugar, and place 12 balls on each sheet.
- Bake one sheet at a time for 8 to 10 minutes, until puffy and set. Leave the cookies on the pan 5 minutes, then move them to a rack to cool completely. Pro Tip: Pull them at 8 minutes if your oven runs hot, so they don’t dry out.
- Put the white chocolate chips in a small bowl. Heat the cream in a small saucepan over medium-low until hot and steaming, without letting it boil. Pour it over the chips, let it sit 2 minutes, then stir until smooth. If chunks remain, microwave in 15-second bursts, stirring between each. Stir in the white food dye if using.
- Spoon a teaspoon-sized dollop of ganache onto the center of each cooled cookie. Drag it outward with a toothpick to form a wavy tail and two little arms. Pro Tip: If the ganache thickens too much to spread, microwave it 5 to 10 seconds and stir.
- Once the ganache is mostly set, dot on two eyes and a mouth with the black writing gel.
Notes
Ingredients for Ghost Cookies
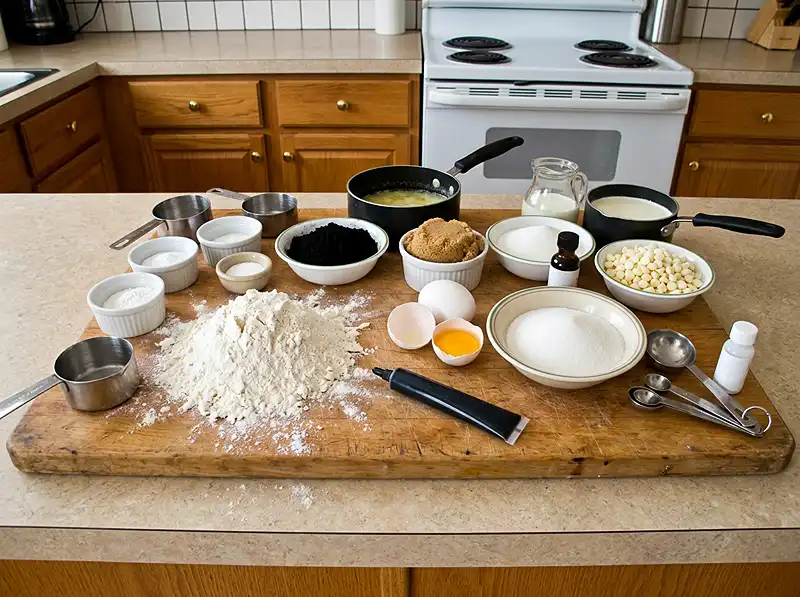
Everything here is pantry-friendly except the black cocoa powder and the writing gel, which are both easy to track down. Here’s the full lineup, grouped by job.
| Ingredient | Amount |
|---|---|
| Black Cocoa Cookies | |
| All-purpose flour | 1 1/3 cups |
| Baking powder | 1/4 tsp |
| Baking soda | 1/4 tsp |
| Salt | 1/2 tsp |
| Black cocoa powder | 1/2 cup |
| Unsalted butter, melted and cooled | 1/2 cup |
| Brown sugar, packed light or dark | 3/4 cup |
| White granulated sugar | 1/4 cup |
| Pure vanilla extract | 1 tsp |
| Large egg, room temperature | 1 |
| Egg yolk, room temperature | 1 |
| For Rolling the Dough | |
| White granulated sugar | 1/3 cup |
| White Chocolate Ganache | |
| White chocolate chips (use a good quality brand) | 1 cup |
| Heavy cream | 1/3 cup |
| White food dye (optional) | 2 to 4 drops |
| For the Faces | |
| Black writing gel | 1 tube |
A Few Quick Notes on the Key Ingredients
Black cocoa powder: This is ultra-Dutched cocoa, which means it’s been treated to be extra dark and mellow. If you’re curious about the science, here’s a neat explainer on how Dutch process cocoa works.
White chocolate: Go for chips with real cocoa butter listed in the ingredients. Cheap white chocolate can turn grainy or greasy, and nobody wants a gritty ghost.
Marshmallow: Not in the recipe, but I’ll admit a marshmallow was my first ghost idea. The ganache wins because it sets smooth and holds a face beautifully. Marshmallow makes a fun variation, though (more on that below).
Black writing gel: I grabbed mine in the baking aisle at Walmart. It comes with a fine tip, so your spooky icing face looks intentional instead of chaotic.
How to Make Ghost Cookies, Step by Step
Heads up: there’s a little resting time and a little cooling time, but nothing tricky. Read through once, then go be a cookie wizard.
Mix the Dry Ingredients
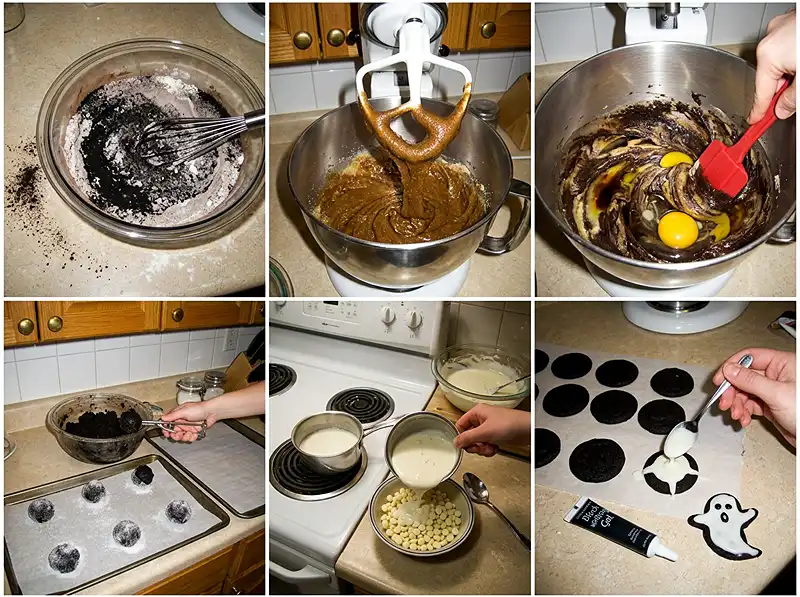
In a medium bowl, whisk together the flour, black cocoa powder, baking soda, baking powder, and salt. Set it aside. The mixture will look like a bowl of dark, dusty midnight.
Tip: black cocoa is super fine and floats everywhere. Whisk gently unless you want a chocolate-dusted kitchen.
Make the Cookie Dough
In a separate bowl, combine the melted butter, brown sugar, and 1/4 cup granulated sugar. Mix with a mixer on high speed for 2 full minutes. It’ll turn thick, glossy, and smell like caramel.
Add the vanilla, egg, and egg yolk. Mix on medium speed until just combined. Then add the dry ingredients on low speed, again just until combined. Trust me, don’t overmix here.
Rest, Scoop, and Roll
Preheat your oven to 350°F. Line 2 cookie sheets with parchment paper. Now let the dough rest for 10 minutes before scooping. Yes, I know you’re excited. Don’t skip this part.
Pour the 1/3 cup granulated sugar into a bowl. Use a small cookie scoop (1 ounce or about 1 tablespoon) to portion the dough. Roll each ball in the sugar, then place 12 balls on each cookie sheet.
Bake the Black Cocoa Cookies
Bake one sheet at a time for 8 to 10 minutes. The cookies will look puffy and set, and your kitchen will smell like a brownie factory. So good my neighbors might show up.
Let the cookies sit on the hot pan for 5 minutes. Then move them to a cooling rack and let them cool completely. Warm cookies plus ganache equals a melty ghost disaster.
Make the White Chocolate Ganache
Pour the white chocolate chips into a small bowl. Add the heavy cream to a small saucepan or frying pan and heat on medium-low until it’s hot and steaming. Don’t let it boil.
Pour the hot cream over the chips and let it sit for 2 minutes. Then stir until smooth. If a few chunks stick around, microwave in 15-second bursts, stirring between each, until melted.
Want a brighter, snow-white ghost? Stir in 2 to 4 drops of white food dye. It’s optional, but it makes the ghosts pop against the black cookie.
Draw the Ghost and the Spooky Icing Face
Use a teaspoon to pour a dollop of ganache right in the center of a cooled cookie. Grab a toothpick and drag the ganache outward to make a tail and two little arms. It takes about three seconds once you get the hang of it.
Repeat on every cookie. Once the ganache is mostly set, use the black writing gel to dot on two eyes and a mouth. Give each ghost a personality. Mine always end up looking a little surprised.
Pro Tips, Variations, and Troubleshooting for Ghost Cookies
Pro Tips for the Best Ghost Cookies
Work while the ganache is warm. If it thickens too much, pop it in the microwave for 5 to 10 seconds and stir. Thick ganache will not spread into a ghost shape.
Use cooled cookies only. Warm cookies melt the white chocolate and your ghost turns into a puddle.
Test one cookie first. The first ghost is your practice ghost. We all have one.
Wait for the ganache to set a little before adding the face. Gel dots sink into very wet ganache and smear.
Fun Variations
Marshmallow ghosts: Skip the ganache and top each cooled cookie with a large marshmallow or a swirl of marshmallow fluff. Add a face with the gel. It’s squishier and extra silly.
Mint ghosts: Add a tiny drop of peppermint extract to the ganache. It tastes like a spooky thin mint.
Bat-and-pumpkin mix: Use orange-tinted white chocolate for a few cookies. Now you’ve got a whole Halloween party on one tray.
Sprinkle it up: Press a few mini chocolate chips or sprinkles around the ghost before the ganache sets.
Troubleshooting
My ganache is grainy. The cream was probably too hot, or the chips were low quality. Warm it gently in 10-second bursts and stir well. A tiny splash of extra cream can smooth it out.
My cookies spread too much. Make sure your butter cooled before mixing, and don’t skip the 10-minute rest. Cool baking sheets help too.
My ghosts look blobby. The ganache is probably too thin. Let it sit for a few minutes to thicken slightly, then try again.
My cookies feel dry. Overbaking is the usual culprit. Pull them at 8 minutes if your oven runs hot.
Storing Your Ghost Cookies
Once the ganache sets, these ghost cookies store beautifully. Here’s the quick cheat sheet.
| Method | How to Do It | How Long |
|---|---|---|
| Room temperature | Airtight container, single layer or parchment between layers | Up to 2 days |
| Refrigerator | Airtight container, parchment between layers | Up to 5 days |
| Freezer (undecorated) | Freezer-safe bag with air pressed out | Up to 3 months |
Because the ganache contains cream, I like to keep decorated cookies in the fridge if it’s warm out. For general guidance, the USDA has a helpful page on leftovers and food safety.
Reheating Tips
Cold cookies are fine, but a warm one is dreamy. For undecorated cookies, microwave for 8 to 10 seconds for that fresh-baked softness.
Decorated ghosts? Let them sit at room temperature for 10 to 15 minutes instead. A microwave will melt your ghost’s face right off.
No-Waste Ideas
Use that spare egg white. This recipe calls for an extra yolk, so you’ll have a lonely egg white. Whip up a batch of easy meringue cookies and you’re all set.
Crumble broken cookies. Sprinkle them over vanilla ice cream or fold them into milkshakes. It’s basically a fancy cookies-and-cream situation.
Save extra ganache. Chill it, scoop it, and roll it into white chocolate truffles. Or drizzle it over popcorn.
Need more sugar-rolled cookies? Try these jasmine sugar cookies for something floral and soft. Craving a lighter treat? These monk fruit chocolate chip cookies are worth a look.
Frequently Asked Questions
Can I use regular cocoa powder instead of black cocoa?
Yes, but the cookies will bake up brown instead of jet black, and the flavor will be a little less deep. The white ganache ghosts will still look cute. For the true spooky effect, black cocoa is worth hunting down.
Why do I need to rest the cookie dough?
Resting lets the flour absorb moisture and the melted butter firm up slightly. That helps your ghost cookies keep their shape and bake up thicker instead of spreading too thin.
Can I make the ganache ahead of time?
Yes. Store it in the fridge in an airtight container for up to 3 days, then warm it gently in 10-second bursts until it’s pourable again. Stir well before using.
What if I can’t find black writing gel?
Melt a small amount of dark chocolate and pipe the face with a toothpick or a tiny piping bag. Black icing in a tube also works. Just let the ganache set a little first so the face doesn’t sink.
Conclusion
These ghost cookies are fudgy, dramatic, and just silly enough to make everyone smile. Give them a try this Halloween season and let your inner pastry chef run wild.
Save this recipe on Pinterest so you can find it next October (or, let’s be real, next Tuesday). Then come back and tell me how your ghosts turned out in the comments. I want to see every wonky, adorable face.
