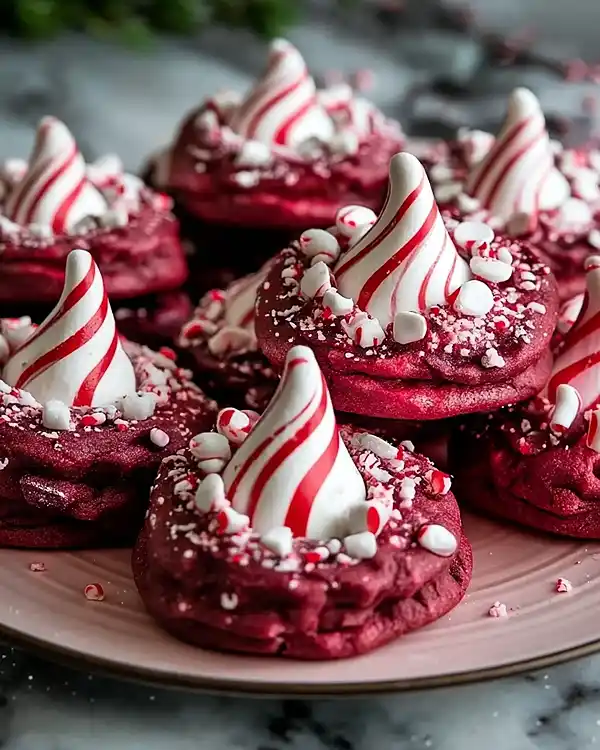
Peppermint Red Velvet Blossoms combine festive red velvet with minty candy kisses. Easy holiday cookies ready in 30 minutes—perfect for Christmas!
Hey, I’m Linda! Welcome to Tasty at Home, where bold flavors meet everyday kitchens. Last December, I burned my first batch of these Peppermint Red Velvet Blossoms because I got distracted wrapping presents. The smell? Divine disaster.
But man, oh man—once I nailed the timing, these cookies became my holiday obsession. They’re festive, soft, and that peppermint kiss on top? Pure magic.
Tasty at Home – Where bold flavors meet everyday kitchens.
Table of Contents
What Makes These Peppermint Red Velvet Blossoms Special

These aren’t your standard blossom cookies. The peppermint red velvet base combines rich cocoa with tangy buttermilk, creating a tender crumb that melts on your tongue. The vibrant crimson color screams celebration.
Each cookie gets crowned with a peppermint candy kiss while warm from the oven. The heat softens the chocolate-mint candy just enough to create that signature thumbprint look. It’s like those classic red velvet cream cheese thumbprint cookies met a candy cane at a holiday party.
I’ve tested this recipe seventeen times (yes, seventeen). My family didn’t complain once about being taste-testers.

Peppermint Red Velvet Blossoms
Equipment
- two mixing bowls
- Electric mixer
- Measuring cups and spoons
- Whisk
- Two baking sheets
- Parchment paper
- Wire cooling rack
- Plastic wrap
Ingredients
Dry Ingredients
- 1 ¼ cups All-purpose flour King Arthur recommended
- ¼ cup Unsweetened cocoa powder Dutch-process preferred
- 1 tsp Baking powder Fresh for best rise
- ½ tsp Baking soda Check expiration date
- ¼ tsp Salt Fine sea salt
Wet Ingredients
- ½ cup Unsalted butter Room temperature
- ¾ cup Granulated sugar Extra-fine dissolves better
- 1 large Egg Room temperature
- 1 tsp Vanilla extract Pure, not imitation
- 1 tbsp Red food coloring Gel preferred
- 1 tbsp Buttermilk Full-fat works best
Toppings
- 18-20 Peppermint candy kisses Hershey’s or similar
- For garnish Crushed candy canes Pulse in food processor
Instructions
- Whisk together flour, cocoa powder, baking powder, baking soda, and salt in a medium bowl. Set aside.
- Beat softened butter and sugar in a large bowl for 2-3 minutes until light and fluffy. Add egg and vanilla extract and mix until combined.
- Mix in red food coloring and buttermilk until vibrant crimson. Gradually add dry ingredients and mix until just combined.
- Cover dough with plastic wrap and refrigerate for at least 30 minutes.
- Preheat oven to 350°F (175°C). Line baking sheets with parchment paper.
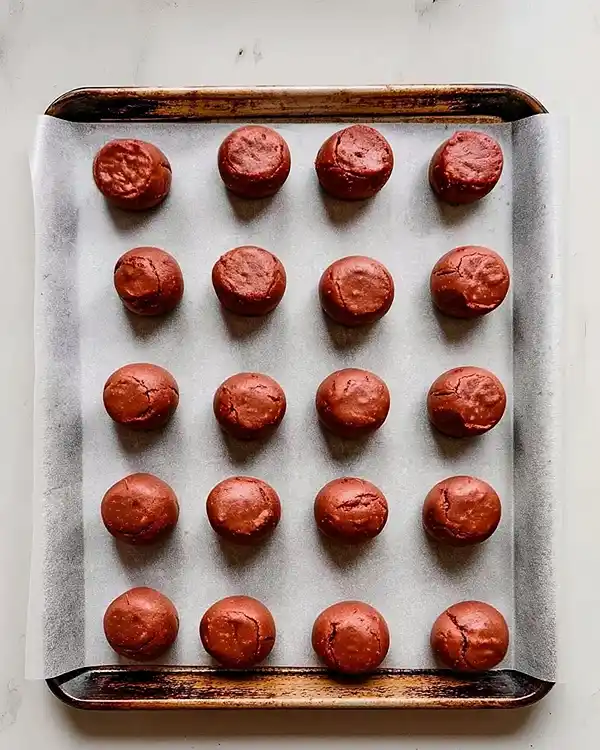
- Roll chilled dough into 1-inch balls, place on sheets 2 inches apart, flatten slightly, and bake for 10-12 minutes.
- Immediately press one peppermint kiss into each cookie center and sprinkle with crushed candy canes.
- Let cookies cool on sheets for 5 minutes, then transfer to a wire rack to cool completely.
Notes
Shopping for the Best Ingredients
Quality matters here, especially with your cocoa powder and food coloring. Look for Dutch-process cocoa for deeper color and richer flavor. Gel food coloring gives you that stunning red without making your dough watery.
Ingredient Breakdown Table
| Ingredient | Amount | Metric | Notes |
|---|---|---|---|
| All-purpose flour | 1 ¼ cups | 156g | King Arthur recommended |
| Unsweetened cocoa powder | ¼ cup | 25g | Dutch-process preferred |
| Baking powder | 1 tsp | 5g | Fresh for best rise |
| Baking soda | ½ tsp | 2.5g | Check expiration date |
| Salt | ¼ tsp | 1.5g | Fine sea salt |
| Unsalted butter | ½ cup | 113g | Room temperature |
| Granulated sugar | ¾ cup | 150g | Extra-fine dissolves better |
| Large egg | 1 | 50g | Room temperature |
| Vanilla extract | 1 tsp | 5ml | Pure, not imitation |
| Red food coloring | 1 tbsp | 15ml | Gel preferred |
| Buttermilk | 1 tbsp | 15ml | Full-fat works best |
| Peppermint candy kisses | 18-20 | — | Hershey’s or similar |
| Crushed candy canes | For garnish | — | Pulse in food processor |
Pro Shopping Tips: Find peppermint candy kisses at Target or Walmart starting in November. They sell out fast, so grab extra bags. European readers can substitute peppermint-filled chocolates or After Eight mints.
Fresh buttermilk creates the signature red velvet tang (Julia Child always emphasized fresh dairy in her baking). No buttermilk? Mix 1 tablespoon milk with ½ teaspoon white vinegar. Let it sit five minutes.
Equipment You’ll Need
Gather these tools before starting:
- Two mixing bowls (medium and large)
- Electric mixer (hand or stand mixer works)
- Measuring cups and spoons
- Whisk
- Two baking sheets
- Parchment paper (prevents sticking and cleanup)
- Wire cooling rack
- Plastic wrap (for chilling dough)
Don’t have an electric mixer? A sturdy wooden spoon and some elbow grease work fine. Your butter just needs to be very soft—leave it out for an hour.
I learned this trick from my grandmother: Room temperature ingredients blend smoother and create better texture. Cold butter creates lumpy dough that bakes unevenly.
How to Make the Best Peppermint Red Velvet Blossoms
Step 1: Prepare the Dry Ingredients
Whisk together flour, cocoa powder, baking powder, baking soda, and salt in your medium bowl. This distributes the leavening agents evenly throughout your dough.
Sensory cue: The cocoa should smell deeply chocolatey—not dusty or stale. Set this bowl aside.
Step 2: Cream the Butter and Sugar
Beat softened butter and sugar in your large bowl for 2-3 minutes until light and fluffy. The mixture should look pale and almost doubled in volume.
Add egg and vanilla extract. Mix until completely combined with no streaks of yolk visible.
Thomas Keller emphasizes proper creaming for tender baked goods. This step incorporates air that helps cookies rise and creates that melt-in-your-mouth texture.
Step 3: Add the Red Velvet Magic
With mixer on low speed, pour in red food coloring and buttermilk. Mix until you achieve a vibrant crimson color. The dough will look almost neon—don’t worry, it bakes to a gorgeous ruby shade.
Gradually add your dry ingredients. Mix just until dough comes together with no flour streaks.
Common mistake alert: Overmixing develops gluten and makes cookies tough. Stop as soon as everything combines.
Step 4: Chill the Dough
Cover dough with plastic wrap, pressing it directly onto the surface. Refrigerate for at least 30 minutes—up to overnight works perfectly.
Chilling firms the butter so cookies hold their shape during baking. Well, I skipped this once and my cookies spread into pancakes. Lesson learned.
The dough should feel firm but still pliable when ready.

Step 5: Preheat and Prep
Set your oven to 350°F (175°C). Line two baking sheets with parchment paper.
Pro tip: Light-colored baking sheets work best. Dark pans absorb heat faster and can burn cookie bottoms.
Unwrap your peppermint kisses now while the oven preheats. You’ll need to work quickly after baking.
Step 6: Shape and Bake the Cookies
Roll chilled dough into 1-inch balls—about the size of a walnut. Place them 2 inches apart on prepared sheets. Gently flatten each ball with your palm.
Bake for 10-12 minutes. Cookies should look set around edges but still soft in the center. They’ll firm up as they cool.
Visual check: Edges should appear dry and matte, not shiny. Centers might look slightly underdone—that’s perfect.

Step 7: Top with Peppermint Kisses
The moment cookies exit the oven, gently press one peppermint kiss into each center. Work quickly but carefully—cookies are hot.
Immediately sprinkle crushed peppermint candies around the kiss base. The residual heat melts the candy slightly, creating an edible glitter effect.
This step requires speed. I recruit helpers during the holidays because timing matters here.
Step 8: Cool Completely
Let cookies rest on baking sheets for 5 minutes. This prevents breakage during transfer. Move to a wire rack and cool completely.
The peppermint kisses soften from cookie heat but firm up within 15 minutes. Resist eating them warm—the kiss stays melty and messy (though delicious).
Expert Tips for Perfect Results
Temperature matters tremendously. Room temperature butter and eggs blend smoother and create even texture throughout your cookies. Cold ingredients create lumpy dough that bakes inconsistently.
Don’t skip the chill time. Refrigerated dough spreads less and bakes into thick, chewy cookies. Warm dough spreads thin and crispy.
Use fresh leavening agents. Baking powder and baking soda lose potency over time. Test your baking powder by dropping ½ teaspoon into hot water—it should bubble vigorously.
Invest in gel food coloring. Liquid coloring adds extra moisture and creates pale pink instead of vibrant red. Gel gives you intense color with just a few drops.
Creative Variations to Try
Chocolate Peppermint Version
Replace red food coloring with extra cocoa powder for deep chocolate cookies. Top with white chocolate peppermint kisses for stunning contrast.
Orange Cranberry Twist
Swap peppermint kisses for orange-filled chocolates. Add 1 teaspoon orange zest to dough. Garnish with dried cranberries instead of crushed candy canes.
Valentine’s Day Adaptation
Use pink food coloring and strawberry-cream candy kisses. Perfect for February celebrations beyond the Christmas season.
Gluten-Free Option
Substitute cup-for-cup gluten-free flour blend (Bob’s Red Mill works great). Add ½ teaspoon xanthan gum if your blend doesn’t include it.
Mini Cookie Bites
Roll dough into ½-inch balls and use Hershey’s Hugs instead of full kisses. Bake for 8-9 minutes. These make terrific party platters—you know, when you need a hundred cookies fast.
Storage and Make-Ahead Magic

Store completely cooled cookies in an airtight container at room temperature. Layer parchment paper between cookie layers to prevent sticking. They stay fresh for 5 days.
Storage Guidelines Table
| Storage Method | Duration | Best For |
|---|---|---|
| Room temperature (airtight) | 5 days | Immediate serving |
| Refrigerator (sealed container) | 10 days | Extended freshness |
| Freezer (flash-frozen, then bagged) | 3 months | Long-term storage |
| Dough (unbaked, wrapped) | 2 months frozen | Bake-fresh option |
Freezing trick: Flash-freeze baked cookies on a baking sheet for 2 hours. Transfer to freezer bags once solid. This prevents them from sticking together.
You can also freeze unbaked dough balls. Roll and freeze on a baking sheet, then bag them. Bake from frozen, adding 2 extra minutes to baking time.
Reheating tip: Warm frozen cookies in a 300°F oven for 5 minutes. They taste freshly baked.
Perfect Pairings
Serve these Peppermint Red Velvet Blossoms with hot chocolate topped with whipped cream and crushed candy canes. The mint-chocolate combination doubles down on holiday flavors.
They’re stunning alongside caramel apple cheesecake bars on a Christmas dessert spread. The tangy cream cheese complements the sweet peppermint beautifully.
For a cozy afternoon, pair them with vanilla chai tea. The warm spices enhance the cocoa notes in the red velvet base.
Create a holiday cookie platter with pumpkin pie cookies and Starbucks copycat birthday cake pops for variety.
Pack them in decorative tins for neighbor gifts. Everyone loves receiving homemade treats during the holidays.
Peppermint Red Velvet Blossoms FAQs
Can I make Peppermint Red Velvet Blossoms without buttermilk?
You can make Peppermint Red Velvet Blossoms without buttermilk by creating a quick substitute. Mix 1 tablespoon whole milk with ½ teaspoon white vinegar or lemon juice. Let it sit for 5 minutes until slightly thickened. This creates the tangy acidity that gives red velvet its signature flavor.
What’s the best way to prevent cookies from spreading too much?
The best way to prevent cookies from spreading is chilling your dough for at least 30 minutes before baking. Cold butter holds its shape longer in the oven, creating thick cookies instead of flat ones. Also ensure your baking sheets are completely cool between batches—warm pans accelerate spreading.
How do I achieve vibrant red color in red velvet cookies?
Achieve vibrant red color by using gel food coloring instead of liquid drops. Gel contains concentrated pigments without extra moisture that dilutes color. Start with 1 tablespoon and add more if needed. The dough looks brighter than the baked result, so don’t worry if it seems neon initially.
Can I substitute regular chocolate kisses for peppermint kisses?
You can substitute regular chocolate kisses if peppermint versions aren’t available. Classic Hershey’s Kisses work perfectly, though you lose the minty flavor contrast. Consider adding ¼ teaspoon peppermint extract to your dough for that refreshing element if using plain chocolate kisses.
Final Thoughts
These Peppermint Red Velvet Blossoms transform your kitchen into a holiday wonderland. The vibrant color, soft texture, and festive peppermint topping make them irresistible at cookie exchanges and family gatherings.
Remember that disaster I mentioned earlier? My first batch taught me patience. These cookies reward careful timing with absolute perfection.
Bake a double batch—they disappear fast. Serve them warm with a glass of cold milk for the ultimate holiday indulgence.
Try pairing them with cheesy garlic rolls for a sweet-savory appetizer spread that surprises guests. The contrast creates memorable flavor combinations.
Your turn! Bake these cookies and share your results in the comments below. Did you try any creative variations? I’d love to hear which version became your family’s new tradition.
Happy baking, and may your holidays be filled with delicious moments!

