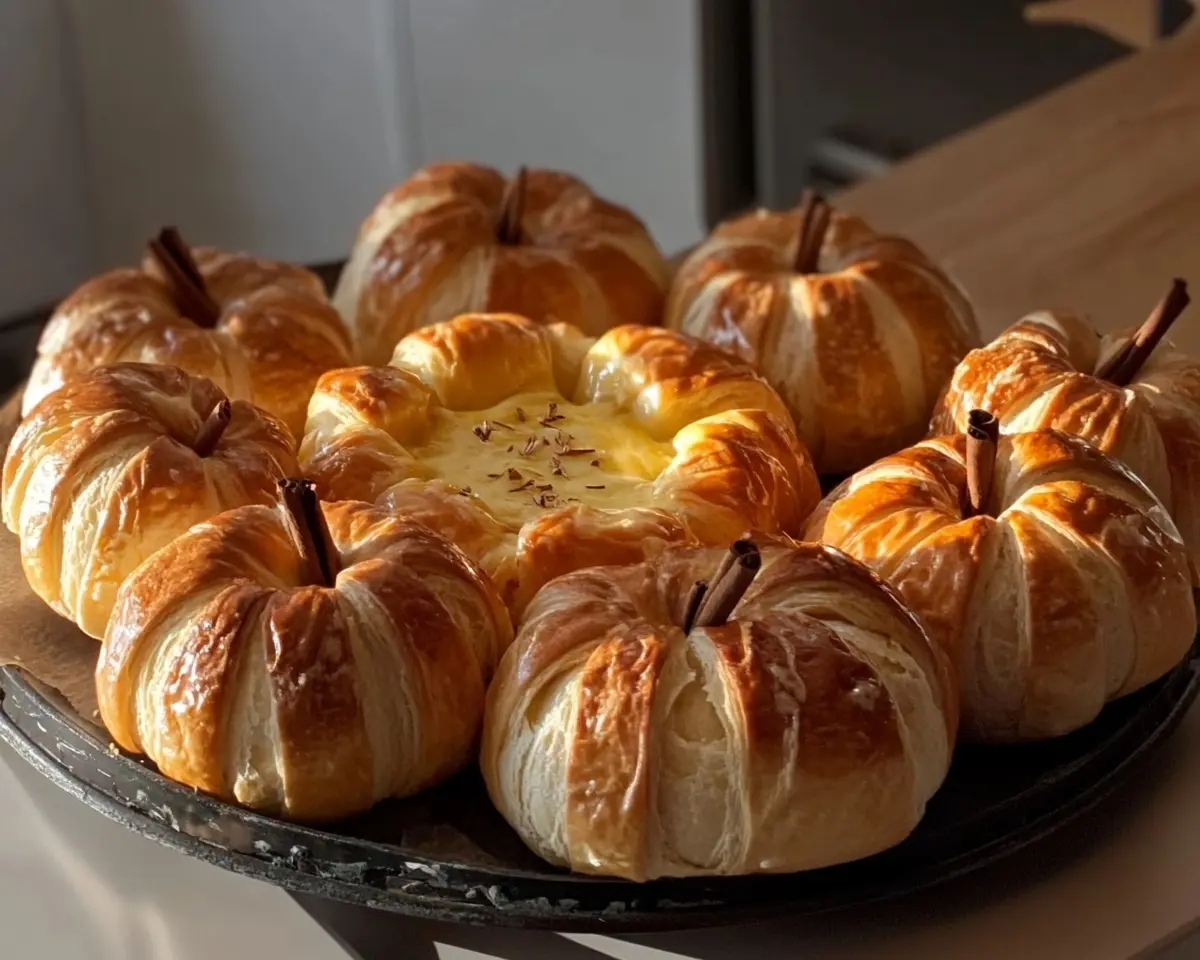
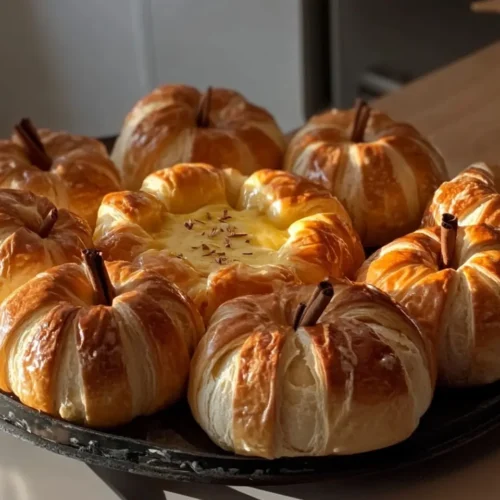
Mini Pumpkin Sourdough Bread Bowls transform your fall table with authentic sourdough taste. Perfect Thanksgiving sourdough bread recipe with step-by-step guide.
Hey there, I’m Linda, and welcome to Tasty at Home—where bold flavors meet everyday kitchens. Last October, while wandering through a Vermont farmers market, I stumbled upon the most adorable mini pumpkins. Well, that sparked an idea that would transform my entire Thanksgiving menu. After burning three batches (oops!) and perfecting the technique through countless trials, I’ve cracked the code on these show-stopping mini pumpkin sourdough bread bowls.
You know what? These aren’t just bread—they’re edible art that’ll make your guests do double-takes. Moreover, they solve that age-old problem of serving individual soup portions with style. Let me tell you, once you master this technique, you’ll never want regular bread bowls again.
Whether you’re a sourdough novice or a seasoned baker, this recipe will guide you through creating eight perfect mini pumpkin vessels. Furthermore, I’ll share every pro tip I’ve learned along the way, including that one crucial mistake that nearly made me give up entirely.
Table of Contents
What Makes These Mini Pumpkin Sourdough Bread Bowls Special
These mini pumpkin sourdough bread bowls combine traditional sourdough craftsmanship with seasonal charm. Additionally, the unique shaping technique creates authentic pumpkin ridges using butcher’s twine—a method inspired by artisan bakers across New England.
The secret lies in achieving the perfect balance between structural integrity and tender crumb. Consequently, each bowl holds hot soup beautifully while delivering that distinctive sourdough tang. Man, oh man, the aroma alone will have your neighbors knocking on your door!
Ingredients for Mini Pumpkin Sourdough Bread Bowls
| Ingredient | US Measurement | Metric | Purpose |
|---|---|---|---|
| Active sourdough starter | ¾ cup + 2 tbsp | 200g | Base fermentation |
| Warm water (85°F) | 3 cups | 700-750g | Hydration |
| Salt | 4½ tsp | 22g | Flavor development |
| Bread flour | 8 cups | 1000g | Structure |
| Oil for twine | 2 tbsp | 30ml | Shaping aid |
| Butcher’s twine | 24-32 pieces | – | Pumpkin ridges |
| Cinnamon sticks | 8 pieces | – | Decorative stems |
| Ice cubes | 6-8 cubes | – | Steam generation |
Essential Equipment for Success
First, gather your equipment before starting. You’ll need a large mixing bowl, kitchen scale, and eight bannetons or small bowls lined with floured cloth. Additionally, prepare two Dutch ovens for optimal baking results.
Next, ensure your sourdough starter is active and bubbly. Test it by dropping a spoonful in water—it should float like a cheerful cork. Furthermore, have sharp kitchen shears ready for trimming twine and scoring decorative patterns.
Step-by-Step Mini Pumpkin Sourdough Instructions
Mix the Dough Foundation
Start by combining your active sourdough starter with 700g warm water in your largest mixing bowl. Stir vigorously until the starter dissolves completely, creating a milky mixture. Then, add salt and bread flour gradually, mixing until no dry flour remains visible.
The dough will look shaggy and rough initially. However, resist adding extra water immediately—let the flour hydrate naturally. Cover with a damp towel and rest for one hour, allowing the gluten network to begin developing.
Master the Stretch and Fold Technique
Thomas Keller emphasizes gentle handling during bulk fermentation, and he’s absolutely right. Wet your hands thoroughly, then grab one side of the dough. Stretch it upward until resistance builds, then fold it over the center.
Rotate your bowl 90 degrees and repeat this process. Continue until the dough feels tight and springs back slightly. Rest for 30 minutes between each of four sessions, building strength gradually.
Perfect Your Bulk Fermentation Timing
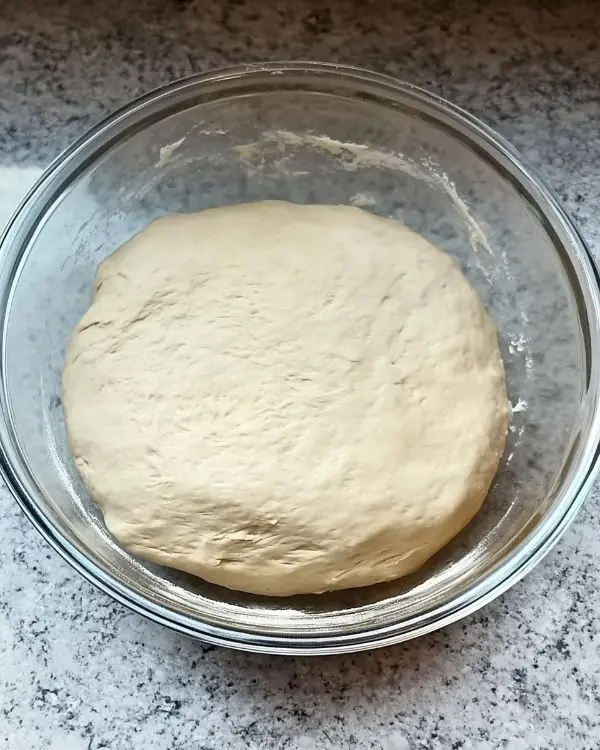
This stage requires patience and observation skills. Watch for subtle signs: the dough becomes smooth, develops a slight dome, and shows scattered bubbles across the surface. Temperature dramatically affects timing—cooler kitchens require longer fermentation periods.
I learned this lesson the hard way during my first attempt. Rushing this stage resulted in dense, poorly risen loaves that barely held their pumpkin shape. Therefore, trust the dough rather than the clock.
Divide and Pre-Shape Like a Pro
Turn your beautifully fermented dough onto an unfloured counter. Using a bench scraper, divide it into eight equal portions of approximately 250g each. Shape each portion into a rough ball by folding edges toward the center.
Flip each ball smooth-side up, then tighten by pushing and pulling against the counter surface. This technique, favored by Julia Child, creates surface tension essential for proper oven spring. Rest these pre-shaped rounds for 30 minutes under a damp cloth.
Final Shaping Creates the Magic
Now comes the exciting part! Flip each ball smooth-side down, then fold the top third toward the center. Next, fold both sides inward, followed by the bottom third upward. This creates a tight package with excellent structure.
Turn the shaped dough smooth-side up and place it seam-down in floured bannetons. Sprinkle additional flour on top, then seal in plastic bags. Refrigerate for 8 to 24 hours—this cold retardation develops incredible flavor complexity.
Creating Authentic Pumpkin Shapes
Prepare Your Twine System
Cut 24 to 32 pieces of butcher’s twine, each about 12 inches long. Soak these pieces in avocado oil briefly, then squeeze out excess oil with paper towels. This prevents the twine from burning during the high-heat baking process.
Meanwhile, preheat your Dutch ovens to 450°F for one full hour. Place two bannetons in the freezer during this preheating period—cold dough holds its shape better during the scoring process.
Execute the Pumpkin Transformation
Lay three to four twine pieces on your counter in a star pattern. Place parchment paper over the twine, then flip your cold dough from the banneton onto the parchment. The cold temperature makes handling much easier.
Gently tie the twine pieces around the dough, creating vertical ridges. The twine should just touch the surface without cutting deeply. Trim excess twine with sharp scissors, leaving small tails for easy removal later.
Scoring Techniques for Extra Character
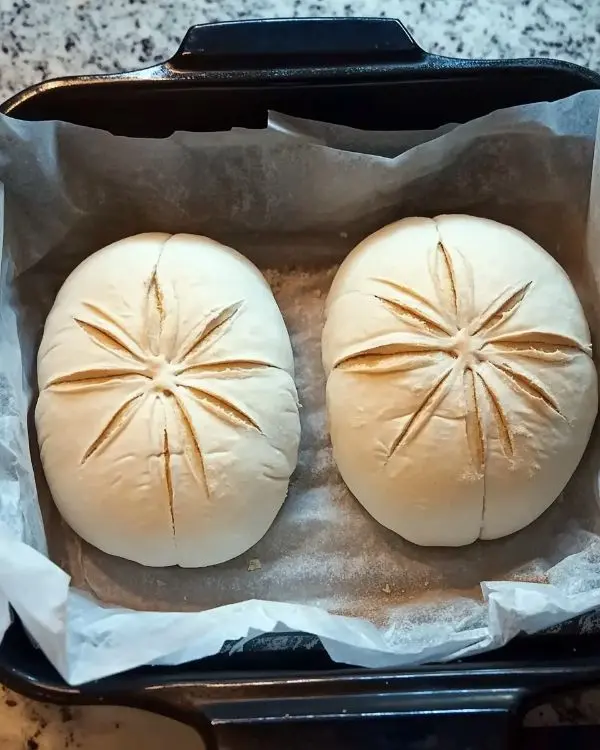
Score decorative patterns on each section between twine ridges using a sharp lame or razor blade. Simple leaf patterns or diagonal slashes work beautifully. However, avoid over-scoring, which can weaken the structure needed for bowl formation.
Baking to Golden Perfection
Steam Generation Creates Crusty Perfection
Carefully place two shaped loaves in each preheated Dutch oven using the parchment paper as handles. Add three to four ice cubes around (not on) each loaf. This steam generation allows maximum oven spring during the initial baking phase.
Cover immediately and bake for exactly 20 minutes at 450°F. The steam creates that glossy, crackling crust that makes sourdough so irresistible. Don’t peek—patience rewards you with superior results!
Finishing Without Steam
Remove the lids and reduce temperature to 400°F. Continue baking for 10 to 20 minutes until the loaves achieve deep golden-brown color. The internal temperature should reach 205°F for fully baked bread.
Listen for that magical hollow sound when tapping the bottom—it indicates perfect doneness. Cool on wire racks for at least 30 minutes before removing the twine while the bread remains slightly warm.
Expert Tips for Flawless Mini Pumpkin Sourdough Bread Results
Timing Your Fermentation Perfectly
Temperature controls everything in sourdough baking. Warmer kitchens (75°F+) accelerate fermentation, while cooler environments require extended timing. Use the “poke test”—gently press the dough surface. It should spring back slowly but not completely.
Professional bakers often use a proofing box or oven with the light on to maintain consistent temperatures. Additionally, covering your dough with plastic wrap prevents skin formation during longer ferments.
Mini Pumpkin Sourdough Creative Variations for Every Occasion
Transform these basic mini pumpkin sourdough bread bowls into themed creations. For Halloween parties, brush with orange-tinted egg wash before baking. Thanksgiving celebrations call for herb-infused versions using rosemary or thyme in the dough.
Moreover, create sweet versions by adding cinnamon and a touch of maple syrup to the dough. These pair magnificently with butternut squash soup or roasted apple bisque during fall dinner parties.
Storage and Make-Ahead Strategies
| Storage Method | Duration | Quality Retention |
|---|---|---|
| Counter (wrapped) | 2-3 days | Excellent |
| Refrigerator | 1 week | Good |
| Freezer (whole) | 3 months | Excellent |
| Freezer (sliced) | 2 months | Good |
Freeze extra loaves in sealed bags immediately after cooling. To refresh, thaw completely, spritz lightly with water, then reheat in a 350°F oven for 8-10 minutes. This technique restores the crispy crust beautifully.
Serving Suggestions and Pairings
These versatile bread bowls complement numerous fall soups perfectly. Try pairing them with my sweet sourdough pumpkin bread for a themed menu. Additionally, they work wonderfully with hearty stews, chowders, and bisques.
For elegant dinner parties, serve alongside apple crumble cheesecake as a seasonal dessert pairing. The contrast between savory bread and sweet dessert creates memorable dining experiences.
Furthermore, consider creating a soup bar featuring multiple varieties served in individual bread bowls. This interactive approach lets guests customize their experience while showcasing your baking skills impressively.
FAQ – Mini Pumpkin Sourdough Bread Bowls
Why is sourdough bread not fattening?
Sourdough bread contains beneficial bacteria that break down gluten and phytic acid, making nutrients more bioavailable. The fermentation process also creates resistant starch, which supports digestive health and helps regulate blood sugar levels more effectively than commercial breads.
What size bowl is best for sourdough bread?
For mini pumpkin sourdough bread bowls, aim for 4-5 inch diameter openings with 2-3 inch depth. This size perfectly accommodates individual soup servings while maintaining structural integrity. Larger bowls may collapse under the weight of hot liquids.
Can you add pumpkin to sourdough?
Absolutely! Add ½ cup pumpkin puree to the dough during mixing, reducing water by 2-3 tablespoons accordingly. The natural sugars in pumpkin enhance fermentation activity, potentially shortening bulk fermentation time by 30-45 minutes.
Why does my pumpkin bread have no flavor?
Insufficient fermentation typically causes bland pumpkin bread. Extend your bulk fermentation until the dough shows clear signs of activity: bubbling surface, 50% size increase, and jiggly texture. Additionally, ensure your starter is properly active before beginning the recipe.
Is it bad to eat sourdough every day?
Daily sourdough consumption is generally healthy due to its probiotic content and lower glycemic index. However, portion control remains important. These mini bread bowls provide perfect individual serving sizes, helping maintain balanced nutrition while enjoying delicious homemade bread regularly.
Transform Your Fall Table Today
These mini pumpkin sourdough bread bowls represent more than just bread—they’re edible centerpieces that spark conversations and create lasting memories. The combination of traditional sourdough techniques with creative seasonal shaping elevates any autumn gathering into something truly special.
Remember that Vermont farmers market inspiration? Now you have the tools to recreate that magic in your own kitchen. Start your starter tonight, gather your ingredients tomorrow, and prepare to amaze your family and friends this weekend.
Consider pairing these delightful bread bowls with my Halloween pumpkin spice cookies for the ultimate autumn dessert spread. Additionally, don’t forget to snap photos of your creations—these beautiful bread bowls deserve to be shared with the world!
Tasty at Home – Where bold flavors meet everyday kitchens.
Mini Pumpkin Sourdough Bread Bowls
Equipment
- Large mixing bowl
- Kitchen scale
- 8 bannetons or small bowls
- 2 Dutch ovens
- Bench scraper
- Sharp kitchen shears
- Lame or razor blade
Ingredients
Dough
- 200 g Active sourdough starter ¾ cup + 2 tbsp
- 700-750 g Warm water 85°F, 3 cups
- 22 g Salt 4½ tsp
- 1000 g Bread flour 8 cups
Shaping and Decoration
- 2 tbsp Oil for twine 30ml
- 24-32 pieces Butcher’s twine 12 inches each
- 8 pieces Cinnamon sticks decorative stems
- 6-8 cubes Ice cubes for steam
Instructions
- Combine active sourdough starter with 700g warm water in your largest mixing bowl. Stir vigorously until the starter dissolves completely, creating a milky mixture. Add salt and bread flour gradually, mixing until no dry flour remains visible. Cover with damp towel and rest for 1 hour.
- Perform stretch and folds: wet your hands, grab one side of the dough, stretch upward until resistance builds, then fold over center. Rotate bowl 90 degrees and repeat. Continue until dough feels tight and springs back slightly. Rest 30 minutes between each of four sessions.
- Allow bulk fermentation until dough becomes smooth, develops slight dome, and shows scattered bubbles across surface. This takes 4-6 hours depending on temperature. Watch for 50% size increase and jiggly texture.
- Turn dough onto unfloured counter and divide into 8 equal portions of approximately 250g each using bench scraper. Shape each portion into rough ball by folding edges toward center. Flip smooth-side up and tighten by pushing against counter. Rest 30 minutes under damp cloth.
- Final shaping: flip each ball smooth-side down, fold top third toward center, fold both sides inward, then bottom third upward. Turn smooth-side up and place seam-down in floured bannetons. Sprinkle additional flour on top, seal in plastic bags, and refrigerate 8-24 hours.
- Cut 24-32 pieces of butcher’s twine, each 12 inches long. Soak in oil briefly, then squeeze out excess. Preheat Dutch ovens to 450°F for 1 hour. Place 2 bannetons in freezer during preheating.
- Lay 3-4 twine pieces on counter in star pattern. Place parchment over twine, flip cold dough from banneton onto parchment. Gently tie twine around dough creating vertical ridges. Trim excess twine, leaving small tails. Score decorative patterns between ridges.
- Place 2 shaped loaves in each preheated Dutch oven using parchment as handles. Add 3-4 ice cubes around (not on) each loaf. Cover and bake 20 minutes at 450°F.
- Remove lids, reduce temperature to 400°F, and continue baking 10-20 minutes until deep golden-brown and internal temperature reaches 205°F. Cool on wire racks 30 minutes before removing twine while bread is slightly warm.

