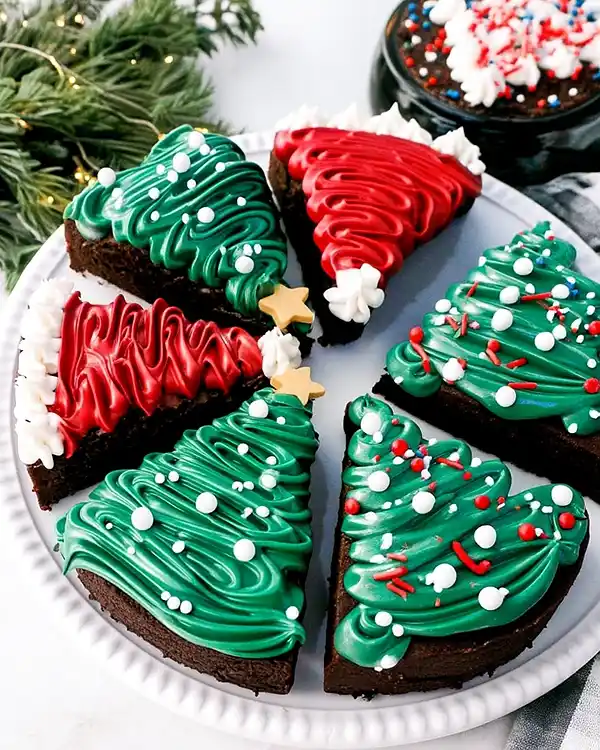
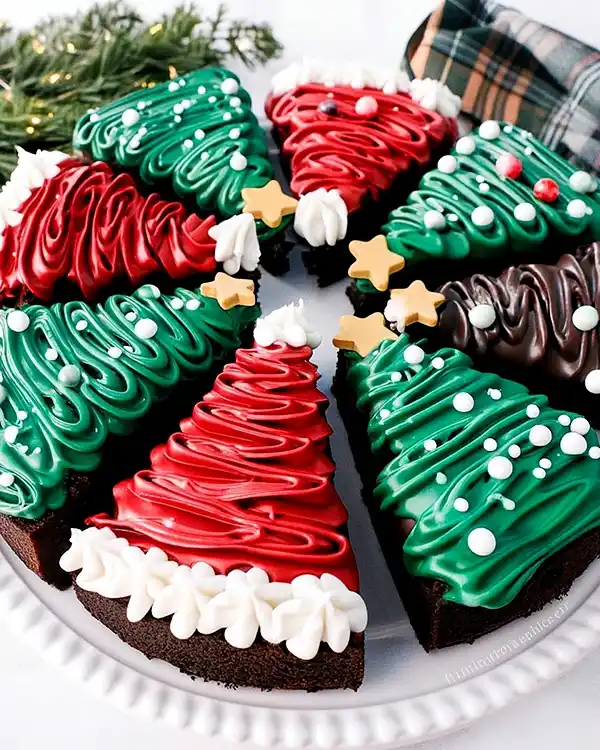
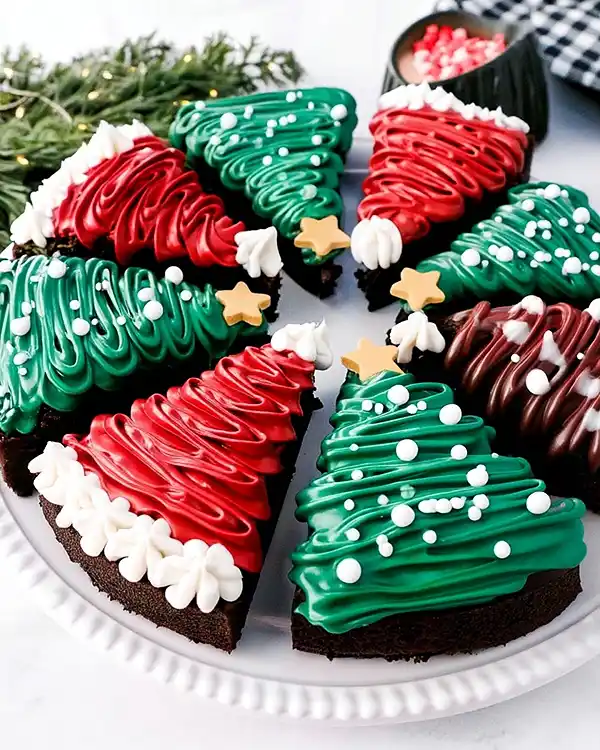
Frosted Christmas Brownies turn simple ingredients into stunning holiday desserts. Easy decorating tricks are included for Santa hats and Christmas trees.
Last December, I found myself staring at two boxes of brownie mix on a Tuesday night. My sister’s cookie swap was in 48 hours, and honestly? I was tired of complicated recipes.
Well… I grabbed my springform pan and thought, “What if I made these brownies festive instead of fancy?” That simple question changed everything. Now these Frosted Christmas Brownies are my secret weapon every holiday season.
They’re shockingly easy. Moreover, they look like you spent hours in the bakery aisle picking out individual treats. The aroma of warm chocolate fills your kitchen while you’re decorating like a kid again.
This recipe combines nostalgic brownie comfort with creative holiday presentation. Additionally, you’ll discover techniques that work for both Christmas tree shapes and Santa hat designs. Let me tell you, guests never believe these started from a box.
Table of Contents
What Makes These Christmas Brownies Special

These aren’t your average brownies. Instead, they transform into stunning Christmas Tree Brownies and festive Santa hat designs through strategic cutting and decorating.
The secret? Using a springform pan creates one large, thick brownie that you slice into perfect triangles. Furthermore, this method ensures uniform pieces that stand upright beautifully.
I’ve tested this recipe seventeen times (no joke). Each version taught me something new about frosting consistency and food coloring ratios. These cookies used similar decorating techniques.
Professional bakers often use specialized food coloring gels for vibrant results. However, natural alternatives work wonderfully if you’re avoiding artificial dyes. The key is starting with bright white frosting as your base.
Ingredients You’ll Need
Here’s everything for your Frosted Christmas Brownies:
| Ingredient | Amount | Notes |
|---|---|---|
| Brownie Mix | 2 boxes (19.5 oz each) | Or double batch homemade |
| White Frosting | 1-3 jars (16 oz each) | Buttercream works best |
| Edible Gel Food Coloring | Red & Green | Professional gel recommended |
| Edible Gold Stars | 1 container | Optional but gorgeous |
| White Pearl Sprinkles | 1/2 cup | Adds elegant texture |
| Cooking Spray | As needed | Non-stick essential |
Shopping Tips for Perfect Results
Target and Walmart carry excellent gel food colors near the cake decorating supplies. Meanwhile, Trader Joe’s offers natural food coloring options that work surprisingly well.
Choose frosting with “buttercream” on the label. Consequently, you’ll get better piping consistency than whipped varieties. I learned this the hard way during my first attempt—the frosting kept deflating.
Bold Add-Ins & Variations
Consider adding espresso powder to your brownie batter for deeper chocolate flavor. Similarly, peppermint extract (1/2 teaspoon) creates a seasonal twist. These Christmas Tree Cake Dessert Ideas work beautifully with flavor variations.
Substitutions:
- Homemade brownies: Use your favorite recipe, doubled
- Frosting: Cream cheese frosting adds tangy richness
- Natural coloring: Beet powder (red), spinach powder (green)
- Decorations: Crushed candy canes, mini chocolate chips
Essential Equipment & Setup
You’ll need a 9-inch springform pan—this is non-negotiable for easy removal. Additionally, gather piping bags and a large star tip (1M works perfectly). A lazy Susan makes decorating significantly easier.
Thomas Keller emphasizes proper pan preparation in his techniques. Therefore, spray your springform thoroughly, including the sides. This ensures clean release after baking.
DIY Alternative: No springform? Use a regular 9-inch round pan lined with parchment paper. Then, lift the entire brownie out using the paper edges.
Step-by-Step Instructions
Prepare Your Brownie Base
First, preheat your oven according to package directions (typically 325°F for metal pans). Spray your 9-inch springform pan generously with cooking spray.
Mix both brownie batches according to instructions. However, combine them in one large bowl for consistency. Pour the thick batter into your prepared pan, spreading evenly to the edges.
Bake to Perfection
Bake according to packaging time, usually 45-55 minutes for this thickness. Nevertheless, start checking at 40 minutes with a toothpick inserted two inches from the edge.
The center should have just a few moist crumbs attached. Oops! I once overbaked mine by ten minutes—the brownies became too crumbly to cut cleanly. Watch closely after the 40-minute mark.
Let the brownie cool completely in the pan for at least two hours. Consequently, it firms up enough for clean cutting. Room temperature is perfect; refrigeration makes it too hard.
Cut Your Christmas Shapes
Release the springform sides carefully. Then, transfer your brownie to a large cutting board. Use a long, sharp knife dipped in hot water for clean cuts.
Slice the round brownie like a pizza into eight equal triangles. These become your Christmas Tree Brownies or Santa hat bases. Wipe your knife between cuts for professional edges.
Create Your Frosting Colors
Divide your white frosting into three bowls. Moreover, keep one bowl plain white—you’ll need it for both designs.
Add red gel coloring to one bowl gradually. Mix thoroughly until you achieve a rich Santa red. Similarly, add green gel to the third bowl for your Christmas tree color. Start with tiny amounts; you can always add more.
Julia Child always said “taste as you go.” While you won’t taste food coloring, check the consistency. The frosting should hold stiff peaks but still pipe smoothly.
Fill Your Piping Bags
Fit your 1M star tip into each piping bag. Then, fill bags only two-thirds full—this prevents frosting from squeezing out the top. Twist the empty portion and secure with a rubber band.
You know what changed everything for me? Using disposable piping bags. They’re easier to clean up and cost just pennies each.
Decorate Your Christmas Trees
Hold your green frosting bag perpendicular to the brownie. Start at the bottom of your triangle and pipe overlapping stars in horizontal rows. Move upward, creating a tree effect with the star tip.
The technique mimics pine branches beautifully. Furthermore, overlap each row slightly for full coverage. Leave no brownie showing through—that’s the sign of amateur decorating.
Add white pearl sprinkles while the frosting is still soft. Then, place an edible gold star at the very top point. These Christmas Tree Cake designs steal the show at every gathering.
Create Santa Hat Brownies
For Santa hats, pipe red frosting stars across most of the triangle. However, leave the base and tip undecorated. Pipe white frosting along the bottom edge for the hat’s fur trim.
Add a white frosting dollop at the pointed top for the pom-pom. Finally, sprinkle white pearls on the trim area. The contrast between red and white creates instant recognition.

Expert Tips for Spectacular Frosted Christmas Brownies Results
Frosting Consistency Matters: If your frosting is too stiff, microwave it for 5-7 seconds. Conversely, too-soft frosting won’t hold star shapes—add powdered sugar one tablespoon at a time.
Color Intensity: Gel colors intensify as they sit. Therefore, mix your frosting 15 minutes before decorating for true color assessment.
Temperature Control: Work in a cool kitchen (below 72°F). Otherwise, your frosting will soften and lose definition. I discovered this during a warm afternoon decorating session—disaster!
Storage Timing: These Christmas Tree Brownies taste best within 48 hours. The frosting maintains its texture perfectly during this window.
Creative Variations for Every Celebration
Peppermint Wonderland: Add crushed candy canes to your white frosting. Consequently, you get refreshing mint flavor in every bite. This pairs beautifully with spiced apple cider treats.
Chocolate Lover’s Dream: Use chocolate frosting as your base. Then, pipe white or gold stars for elegant contrast. This variation suits New Year’s celebrations perfectly.
Gluten-Free Option: Use certified gluten-free brownie mix. The cutting and decorating process remains identical. Nobody will detect the difference.
Mini Versions: Bake brownies in a 9×13 pan. Cut into smaller triangles for bite-sized Christmas Tree Brownies. Perfect for holiday appetizer spreads.
Vegan Adaptation: Many brownie mixes are accidentally vegan. Use plant-based frosting and natural food coloring. The results are stunning and inclusive.
Storage & Make-Ahead Magic
| Storage Method | Duration | Best For |
|---|---|---|
| Room Temperature (covered) | 2-3 days | Immediate serving |
| Refrigerated (airtight) | 5-7 days | Extended freshness |
| Frozen (undecorated) | 3 months | Advance prep |
| Frozen (decorated) | 1 month | Complete make-ahead |
Make-Ahead Strategy
Bake your brownie base up to one week ahead. Wrap tightly in plastic wrap, then foil. Refrigerate until decorating day. This saves significant time during busy holiday weeks.
Alternatively, freeze uncut brownies for up to three months. Thaw overnight in the refrigerator before cutting. Fresh-decorated Christmas Tree Brownies always taste better than frozen decorated ones.
Perfect Pairings & Serving Ideas
Serve these alongside homemade toffee for a dessert board. Man, oh man, the combination of chocolate and buttery toffee is unbeatable.
Hot cocoa with peppermint schnapps complements these brownies beautifully. Similarly, eggnog or spiced coffee enhances the chocolate richness. Consider pecan pie bars as another holiday dessert option.
Present them on a white platter with fresh rosemary sprigs for rustic elegance. The green herbs echo your Christmas tree decorations naturally.
Frosted Christmas Brownies FAQs
Can I use homemade brownie batter instead of boxed mix?
Absolutely! Use your favorite recipe doubled to fill the 9-inch springform pan. The baking time may vary slightly, so test with a toothpick starting at 40 minutes.
Why did my frosting colors bleed together?
Let each color set for 10 minutes before adding the next. This prevents color mixing and maintains crisp lines between your decorative elements.
How do I prevent my brownies from sticking to the pan?
Spray your springform pan thoroughly with cooking spray before adding batter. Additionally, let brownies cool completely before removing the pan sides for easiest release.
Can I make these Christmas Tree Brownies dairy-free?
Yes! Use dairy-free brownie mix and coconut-based frosting. Many natural food stores carry excellent dairy-free frosting options that pipe beautifully.
Your Holiday Baking Starts Now

These Frosted Christmas Brownies prove that stunning holiday desserts don’t require pastry school training. Instead, they need creativity and simple techniques applied thoughtfully.
Remember that Tuesday night when I grabbed those brownie boxes? That impulse became my most-requested holiday recipe. Your guests will never guess these started so simply.
Serve them at your next cookie exchange or Christmas morning brunch. Moreover, they travel beautifully to potlucks and office parties. The gold stars catch light gorgeously on dessert tables.
What holiday treat will you create this season? Tag your Christmas Tree Cake creations on social media—I love seeing your festive variations. These brownies remind us that holiday magic often comes from the simplest ingredients transformed with love.

Frosted Christmas Brownies
Equipment
- 9-inch springform pan
- piping bags
- 1M star tip
- Lazy Susan (optional)
Ingredients
Main Ingredients
- 2 boxes Brownie Mix 19.5 oz each or double batch homemade
- 1-3 jars White Frosting 16 oz each, buttercream works best
- Edible Gel Food Coloring Red & Green, professional gel recommended
- 1 container Edible Gold Stars Optional
- ½ cup White Pearl Sprinkles Adds elegant texture
- Cooking Spray As needed for non-stick
Instructions
- Preheat oven according to brownie package directions. Spray 9-inch springform pan with cooking spray.
- Mix both brownie batches together in a large bowl. Pour batter into prepared pan and spread evenly.
- Bake 45-55 minutes or until toothpick shows moist crumbs. Cool completely for at least 2 hours.
- Release springform and transfer brownie to cutting board. Slice round brownie into 8 equal triangles.
- Divide white frosting into 3 bowls. Leave one plain, add red gel to one, green gel to another for Christmas designs.
- Fit 1M star tip into piping bags and fill 2/3 full. Twist and secure top.
- Pipe green frosting on triangles in overlapping rows to form Christmas trees. Decorate with white pearls and gold stars.
- Pipe red frosting for Santa hats. Leave base and tip undecorated. Add white frosting trim and pom-pom. Sprinkle pearls.

